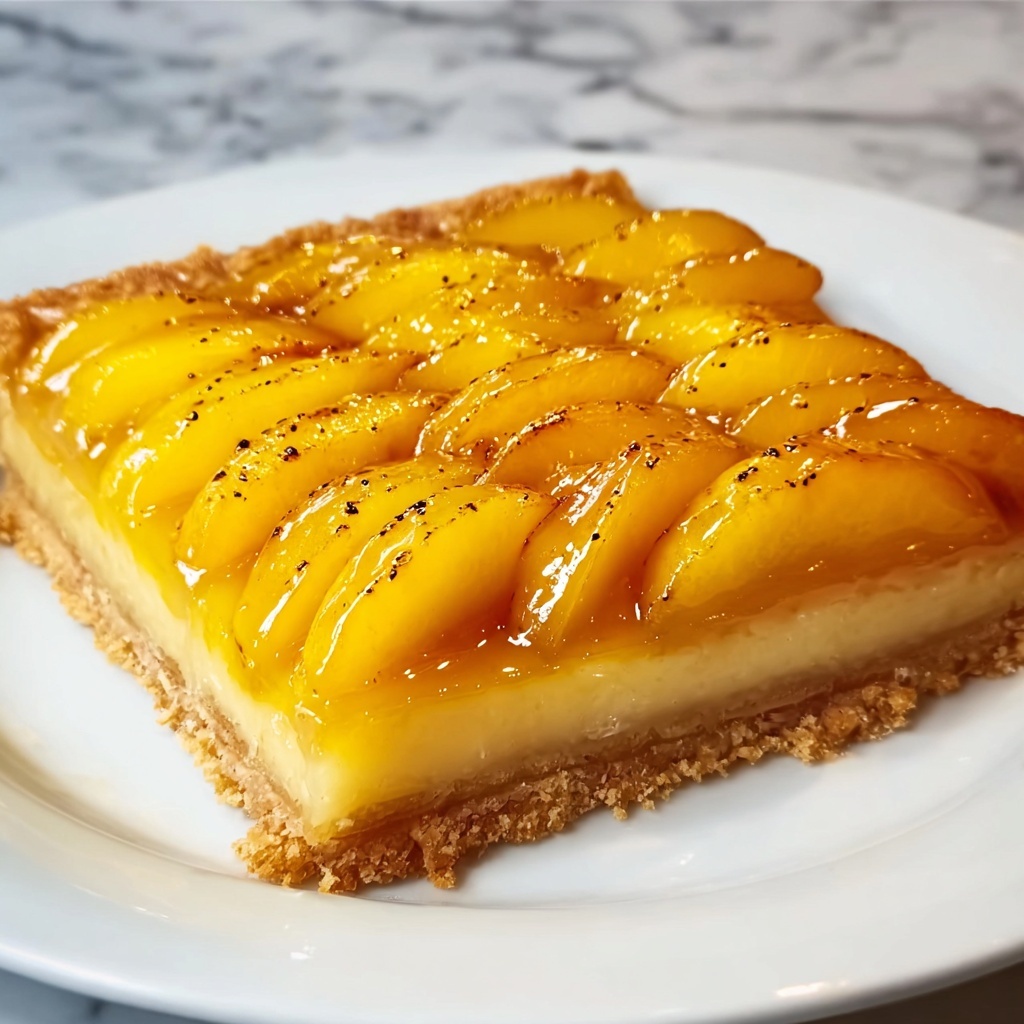
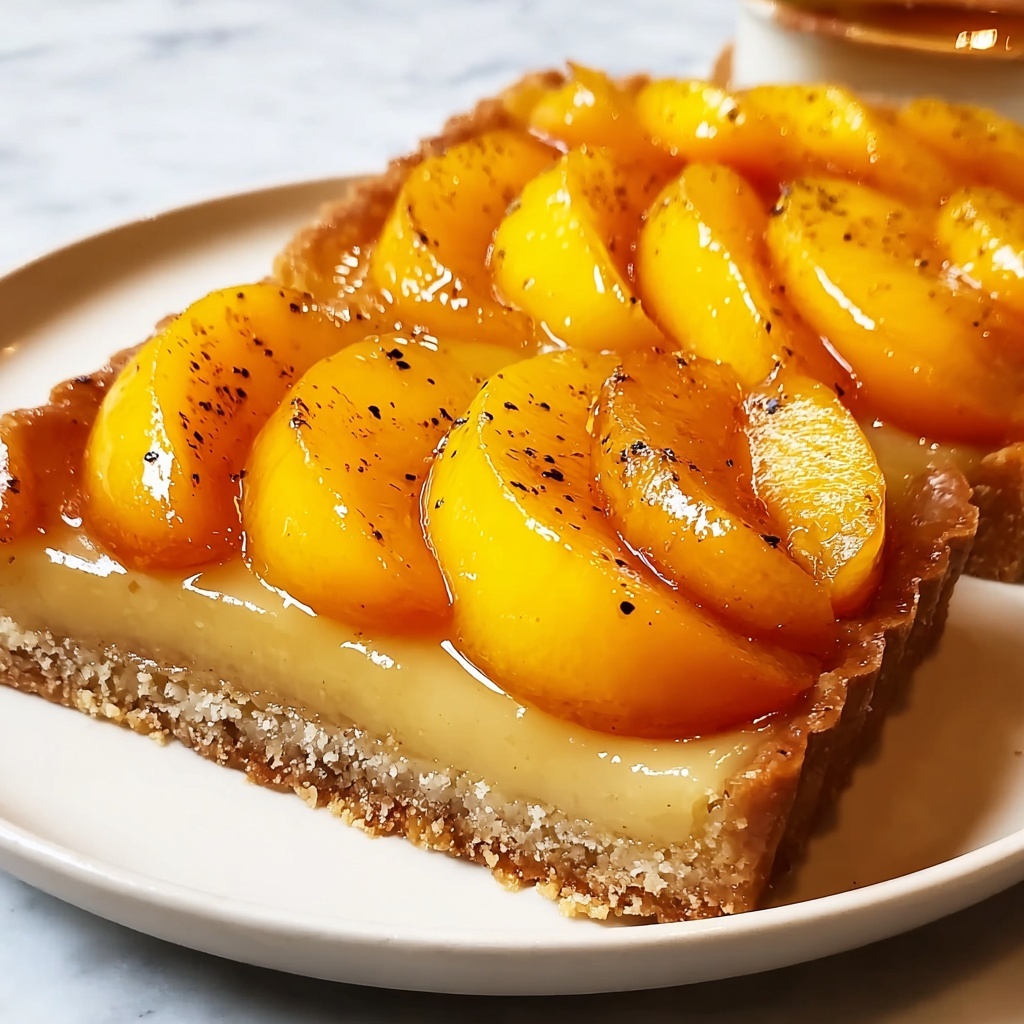
If you’re searching for a show-stopping dessert that beautifully balances fruity freshness and creamy indulgence, this Peach Tart with Pears and Cream Cheese Recipe is a total game-changer. Imagine tender pears sliced so delicately they almost melt on your tongue, perched atop a creamy, vanilla-kissed layer of cream cheese, all nestled in a golden, flaky puff pastry crust. Each bite delivers a perfect harmony of textures and flavors that will have you reaching for seconds before you know it. Whether you’re treating your family or impressing guests, this tart is an elegant yet simple way to celebrate the lovely union of stone fruits and smooth cream cheese.
Ingredients You’ll Need
The beauty of this Peach Tart with Pears and Cream Cheese Recipe lies in the simplicity and quality of its ingredients. Each component plays a crucial role, from the flakiness of the puff pastry to the fresh sweetness of the pears, and the creamy richness of the cream cheese filling, resulting in a dessert that’s as flavorful as it is visually stunning.
- Frozen puff pastry sheet: Provides the golden, buttery crust that serves as the tart’s perfect base.
- Bartlett pears: Juicy and sweet, these pears add a delicate texture and depth of flavor.
- d’Anjou pears: Slightly firmer, offering a wonderful contrast in bite and sweetness.
- Red pear: Adds a pop of color and a touch of tartness to the fruit medley.
- White sugar: Helps to gently sweeten and caramelize the pears during baking.
- Lemon juice: Balances sweetness and prevents the fruit from browning.
- Cream cheese: Softened to creamy perfection, it creates a luscious, dreamy filling.
- Confectioners’ sugar: Sweetens the cream cheese elegantly without graininess.
- Vanilla extract: Infuses the cream cheese layer with warm, aromatic notes.
- Turbinado sugar: Sprinkled on top for a crunchy, caramelized finish that takes the tart to the next level.
How to Make Peach Tart with Pears and Cream Cheese Recipe
Step 1: Prepare the Puff Pastry Base
Start by preheating your oven to 400°F (200°C). Gently unfold your thawed puff pastry sheet and lightly roll it to smooth out any creases. Press the pastry into a 10-inch square tart pan with removable sides, ensuring the edges are neatly trimmed or folded to create a slight crust edge. This flaky base will hold all those luscious pears and creamy goodness, so take your time getting it just right.
Step 2: Slice the Pears Hasselback Style
This part is where the magic begins. Take each pear half and, while keeping the bottom intact, slice them thinly lengthwise using chopsticks or your fingers to guide the cuts. This “hasselback” technique not only looks stunning but allows the baking juices to seep in, creating tender, flavorful fruit layers. Repeat this carefully with all pear halves, making sure not to slice through entirely so the pear fans out beautifully later.
Step 3: Marinate the Pears
Place your hasselback pear halves into a bowl and toss them gently with white sugar and fresh lemon juice. This simple marinade brightens the pears’ natural sweetness and helps develop a lovely caramelized glaze during baking. Let them rest for about 5 minutes so they soak up the flavors and release their juices.
Step 4: Prepare the Cream Cheese Filling
In a small bowl, mix the softened cream cheese with confectioners’ sugar and vanilla extract until smooth and creamy. This luscious mixture is going to be the base layer of richness on your tart, offering a dreamy contrast to the juicy pears. Spread it evenly across the puff pastry base, being careful not to reach the edges—this helps the crust puff nicely as it bakes.
Step 5: Arrange the Pears on the Tart
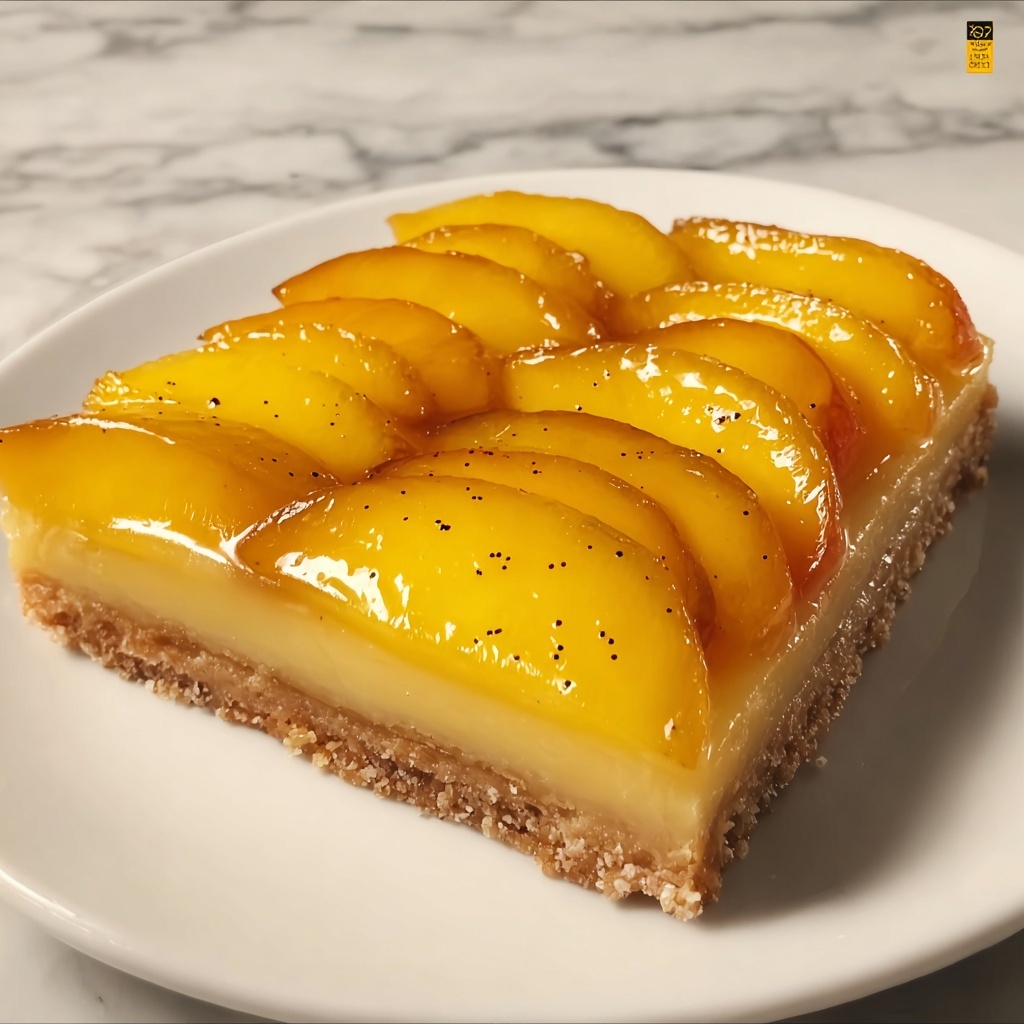
Now comes the satisfying step of layering the pears over the cream cheese. Fan the sliced halves carefully across the surface, arranging them in a visually appealing pattern. Once all pears are in place, drizzle the juices that accumulated in the bowl over them, enhancing their flavor and moisture for that luscious baked finish.
Step 6: Add the Final Touch and Bake
Sprinkle the turbinado sugar generously over the top of the pears. As this sugar caramelizes during baking, it will create a delightful crunch and beautiful golden hue. Bake the tart for about 35 minutes, or until the puff pastry is puffed and golden brown and the juices from the pears are bubbling enticingly around the edges. The kitchen will smell downright irresistible!
Step 7: Cool and Serve
Once out of the oven, let your tart cool briefly in the pan. This resting time allows the filling to set just a bit, making it easier to slice and serve. Then, cut into squares or wedges and prepare to delight in each perfect bite.
How to Serve Peach Tart with Pears and Cream Cheese Recipe
Garnishes
For an extra touch of elegance, consider garnishing your tart with fresh mint leaves, a light dusting of powdered sugar, or even a drizzle of honey. These simple additions brighten the flavors and add a pop of color that transforms your dessert into a stellar centerpiece.
Side Dishes
This tart pairs wonderfully with a scoop of vanilla bean ice cream or a dollop of freshly whipped cream. If you’re looking to balance the richness, a light, citrusy sorbet or a refreshing glass of sparkling wine can play beautifully alongside the dessert.
Creative Ways to Present
Want to take your presentation up a notch? Serve the tart on a rustic wooden board with fresh peach slices and edible flowers scattered around, or offer mini versions of the tart as elegant bites at your next gathering. The fanned pears naturally create an eye-catching look, so simple plating can make a big impact.
Make Ahead and Storage
Storing Leftovers
If you have any leftover Peach Tart with Pears and Cream Cheese Recipe, simply cover it tightly with plastic wrap or store in an airtight container in the refrigerator. The tart keeps well for up to 3 days, and the flavors often deepen beautifully after resting.
Freezing
While the tart is best enjoyed fresh for maximum flakiness, you can freeze leftover slices by wrapping them individually in freezer-safe paper and placing them in a sealed plastic bag. Freeze for up to one month. Thaw in the refrigerator overnight before reheating for the best texture.
Reheating
To warm up your tart leftovers, pop a slice into a preheated oven at 350°F (175°C) for about 10 minutes. This rejuvenates the puff pastry’s crispness without drying out the creamy filling or juicy pears.
FAQs
Can I use fresh peaches instead of pears in this tart?
Absolutely! Fresh peaches would make a delicious alternative, adding a juicy, summery flavor. Just be mindful of their softness compared to pears and adjust baking time accordingly.
Is puff pastry the only type of crust that works?
Puff pastry is ideal for its buttery flakiness, but you could experiment with shortcrust pastry for a sturdier, crumbly base if you prefer a different texture.
How do I soften the cream cheese quickly?
For quick softening, leave it out at room temperature for about 30 minutes or microwave in short 10-second bursts, stirring between intervals to avoid overheating.
Can I prepare this tart entirely in advance?
You can assemble the tart a few hours before baking and keep it refrigerated. Just bake it fresh to maintain that perfectly puffed pastry and vibrant pear texture.
What if I don’t have turbinado sugar for topping?
Granulated sugar works in a pinch, though turbinado’s larger crystals help create that signature crunchy caramelized topping that adds beautiful texture and flavor.
Final Thoughts
This Peach Tart with Pears and Cream Cheese Recipe is a true celebration of fresh fruit and creamy indulgence wrapped in flaky, buttery pastry. Whether you’re baking it for a special occasion or a casual weekend treat, its ease and elegance never fail to impress. Trust me, once you try it, this tart will become a beloved favorite you’ll want to make again and again. So grab those pears and cream cheese, and let the deliciousness begin!
Print
Peach Tart with Pears and Cream Cheese Recipe
- Prep Time: 15 minutes
- Cook Time: 35 minutes
- Total Time: 50 minutes
- Yield: 8 servings
- Category: Dessert
- Method: Baking
- Cuisine: American
Description
This elegant Peach Tart combines a flaky puff pastry base with a luscious cream cheese filling and beautifully sliced pears arranged in a stunning fan design. Sweetened with a touch of sugar and lemon juice, this tart bakes to golden perfection and is perfect for a delightful dessert or afternoon treat.
Ingredients
Puff Pastry
- 1 sheet frozen puff pastry, thawed, unfolded, and lightly rolled
Pears
- 2 Bartlett pears, halved and cored
- 2 d’Anjou pears, halved and cored
- 1 red pear, halved and cored
- 2 tablespoons white sugar
- ½ lemon, juiced
Cream Cheese Filling
- ½ (8 ounce) package cream cheese, softened
- ½ cup confectioners’ sugar
- ½ teaspoon vanilla extract
Topping
- 1 tablespoon turbinado sugar
Instructions
- Preheat Oven and Prepare Puff Pastry: Preheat your oven to 400°F (200°C). Fit the thawed and lightly rolled puff pastry sheet into a 10-inch square tart pan with removable sides, ensuring it covers the base and sides evenly.
- Slice Pears Hasselback Style: Place each pear half, cut-side down on a work surface. Using chopsticks as a slicing guide, thinly slice lengthwise into each pear half, leaving the bottom intact so the slices fan out like a hasselbacked effect. Repeat with all pear halves.
- Coat Pears with Sugar and Lemon: Transfer the hasselbacked pear halves into a bowl. Add white sugar and freshly squeezed lemon juice, tossing gently to coat the pears evenly. Let them sit for 5 minutes to absorb the flavors and soften slightly.
- Prepare Cream Cheese Layer: In a separate bowl, combine softened cream cheese, confectioners’ sugar, and vanilla extract. Mix until smooth and creamy. Spread this mixture evenly over the puff pastry base inside the tart pan.
- Arrange Pears on Tart: Carefully place the sliced pears over the cream cheese layer, fanning the slices out decoratively. Drizzle the juices that have accumulated from the pears over the arranged fruit to add extra flavor and moisture.
- Add Turbinado Sugar and Bake: Sprinkle the turbinado sugar evenly over the top of the pears. Place the tart in the preheated oven and bake for 35 minutes, or until the puff pastry is puffed, golden brown, and the juices are bubbling.
- Cool and Serve: Remove the tart from the oven and let it cool briefly to set before slicing. Serve warm or at room temperature for a delicious dessert.
Notes
- Use a removable tart pan for easy slicing and serving.
- Chopsticks help achieve even, consistent slicing for the hasselback effect.
- Letting pears sit in sugar and lemon juice softens them and enhances flavor.
- The tart can be served warm or allowed to cool completely and refrigerated.
- Try substituting pears with peaches for a seasonal variation.
