
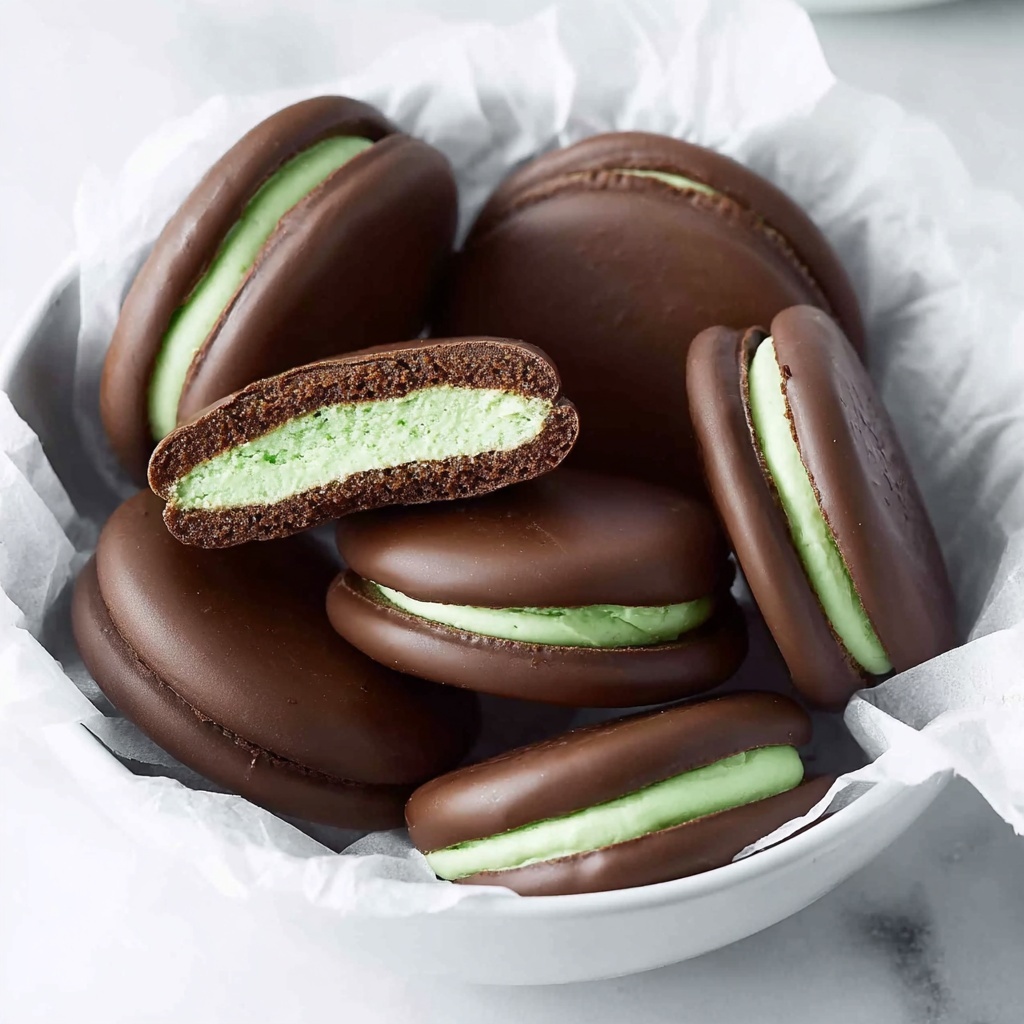
If you’re craving a treat that combines the refreshing zing of mint with the rich indulgence of dark chocolate, you’ve got to try this Mint Sandwich Cookies with Dark Chocolate Coating Recipe. These delightful little sandwiches marry buttery crackers with a creamy, mint-infused filling, all enveloped in a glossy dark chocolate shell. Every bite offers a perfect balance of textures and flavors that feel both nostalgic and sophisticated. Whether you’re making them for a holiday celebration or a cozy afternoon snack, this recipe is a guaranteed crowd-pleaser that will become one of your favorites in no time.
Ingredients You’ll Need
All the best recipes start with simple, well-chosen ingredients, and this Mint Sandwich Cookies with Dark Chocolate Coating Recipe is no exception. Each component plays a vital role in bringing out the perfect taste and texture—from the crispy crackers to the smooth filling and the luscious chocolate coating.
- 72 pieces Butter-Flavored Crackers: These serve as the crunchy base, perfect for sandwiching the creamy mint filling; gluten-free crackers work great if needed.
- 1 pound Dark Chocolate Candy Coating: Melted to smooth perfection, it adds a rich, slightly bittersweet shell that contrasts beautifully with the mint.
- 1 container Vanilla Frosting: The base for the mint filling, providing sweetness and creamy texture that makes these cookies irresistible.
- 1 teaspoon Peppermint Extract: This gives the filling its signature refreshing mint flavor; adjust according to your taste or swap for mint extract for a bolder kick.
- 1 drop Green Food Coloring (optional): Adds a pop of color for a classic minty look, but you can skip this if you prefer a more natural appearance.
How to Make Mint Sandwich Cookies with Dark Chocolate Coating Recipe
Step 1: Mix the Minty Filling
Start by combining the vanilla frosting, peppermint extract, and a few drops of green food coloring in a large bowl. Stir gently until everything is blended and creamy, giving you that perfectly minty, luscious filling that will hold the cookies together and tantalize your taste buds with every bite.
Step 2: Assemble the Cookie Sandwiches
Using a knife or spatula, spread the mint frosting mixture evenly over half of your butter-flavored crackers. Then, place the remaining crackers on top, gently pressing to create little sandwich cookies. This step is all about creating that delightful mint surprise inside, balanced perfectly by the crispy crackers on the outside.
Step 3: Melt the Dark Chocolate
Chop your dark chocolate candy coating into small pieces and place them in a microwave-safe bowl. Heat in 20 to 30-second intervals, stirring after each, until the chocolate is smooth and fully melted. This careful melting process ensures a perfect coating that’s glossy and easy to work with.
Step 4: Dip and Coat
One by one, carefully dip each cookie sandwich into the melted chocolate, making sure it’s completely covered. Let any excess chocolate drip back into the bowl to avoid clumps. This step transforms those simple mint sandwiches into elegant, chocolate-covered gems that look stunning and taste even better.
Step 5: Set the Chocolate
Arrange the dipped cookies on waxed paper or a silicone mat. Leave them to rest at room temperature for 30 to 60 minutes until the chocolate hardens and forms a beautiful shiny shell. This final step is the icing on the cake—actually, the chocolate on the cookie!
Step 6: Store Properly
Once the chocolate is fully set, place your Mint Sandwich Cookies in an airtight container. Store them at room temperature for up to a week so you can enjoy these delicious bites whenever a sweet craving strikes.
How to Serve Mint Sandwich Cookies with Dark Chocolate Coating Recipe

Garnishes
While these cookies are stunning on their own, you can add a festive touch by sprinkling crushed peppermint candies or edible glitter on the wet chocolate right after dipping. A light dusting of powdered sugar or a drizzle of white chocolate adds extra flair if you want to impress your guests.
Side Dishes
These cookies pair wonderfully with a hot cup of coffee or a creamy latte, balancing the minty sweetness and chocolate richness. They’re also fantastic alongside a glass of cold milk or a peppermint hot chocolate for a cozy chill-time treat.
Creative Ways to Present
For parties or gifting, arrange the cookies in decorative tins or wrap small stacks with colorful ribbons. You can also place them on a pretty platter sprinkled with fresh mint leaves to echo the flavor and add a fresh, elegant touch that’s sure to catch eyes and draw compliments.
Make Ahead and Storage
Storing Leftovers
If you find yourself with leftover Mint Sandwich Cookies with Dark Chocolate Coating Recipe, no worries! Keep them sealed in an airtight container at room temperature, and they’ll stay fresh and delicious for up to one week. Avoid refrigeration, as it can dull the chocolate shine and alter the texture.
Freezing
For longer storage, wrap the cookies tightly in plastic wrap and place them in an airtight freezer bag. They can be frozen for up to three months without compromising flavor or texture. When ready to enjoy, thaw them gently at room temperature to keep that perfect chocolate coating intact.
Reheating
These cookies are best enjoyed as is, but if you want the chocolate to soften a little, pop them in a warm spot for 10-15 minutes or near a gentle heat source. Avoid microwaving, as it can melt the chocolate unevenly and change the texture of the filling.
FAQs
Can I use milk chocolate instead of dark chocolate candy coating?
Absolutely! Milk chocolate or semi-sweet chocolate candy coating works perfectly well; it will make the cookies sweeter and softer in flavor, which some might prefer for a milder chocolate taste.
Is there a gluten-free option for the crackers?
Yes, you can substitute the butter-flavored crackers with gluten-free crackers. Just be sure they have a similar texture and thickness to hold the filling properly.
Can I make the mint filling from scratch instead of using frosting?
While the recipe uses store-bought vanilla frosting for convenience, you can definitely make your own mint frosting by whipping butter, powdered sugar, vanilla, peppermint extract, and a little cream until fluffy. It just takes a bit more time but adds a homemade touch.
How long do the cookies keep their freshness?
When stored properly in an airtight container at room temperature, these cookies stay fresh and delicious for about one week. Beyond that, the texture might change, but freezing can extend their shelf life.
Can I skip the green food coloring?
Yes, the green coloring is purely optional and used for that classic mint cookie look. If you prefer a natural appearance or simply want the taste to shine, feel free to leave it out.
Final Thoughts
There’s something truly magical about Mint Sandwich Cookies with Dark Chocolate Coating Recipe—they bring together simple ingredients in a way that feels both comforting and gourmet. Whether you’re new to baking or a seasoned pro, this recipe is a joy to make and share. I encourage you to give it a go and watch how these minty, chocolate-covered delights become a fast favorite in your household too!
Print
Mint Sandwich Cookies with Dark Chocolate Coating Recipe
- Prep Time: 15 minutes
- Cook Time: 30 minutes
- Total Time: 45 minutes
- Yield: 12 servings
- Category: Dessert
- Method: No-Cook
- Cuisine: American
- Diet: Gluten Free
Description
These Mint Sandwich Cookies combine the crispness of butter-flavored crackers with a creamy, mint-infused vanilla frosting filling, all enveloped in a rich dark chocolate coating. Perfect for a refreshing, indulgent treat that’s easy to prepare and sure to impress your guests.
Ingredients
Cookies and Filling
- 72 pieces Butter-Flavored Crackers (can substitute with gluten-free crackers for a gluten-free version)
- 1 container Vanilla Frosting
- 1 teaspoon Peppermint Extract (adjust to taste; mint extract can be used for stronger flavor)
- 1 drop Green Food Coloring (optional)
Chocolate Coating
- 1 pound Dark Chocolate Candy Coating (semi-sweet or milk chocolate alternatives can be used)
Instructions
- Prepare the mint filling: In a large mixing bowl, gently stir together the vanilla frosting, peppermint extract, and a few drops of green food coloring until the mixture is creamy and evenly colored.
- Assemble the sandwich cookies: Using a knife or spatula, evenly spread the mint frosting on half of the butter-flavored crackers. Then, place the remaining crackers on top, pressing gently to form sandwiches.
- Melt the chocolate coating: Chop the dark chocolate candy coating into small pieces and place them in a microwave-safe bowl. Microwave in 20-30 second intervals, stirring frequently until the chocolate is smooth and fully melted.
- Dip the sandwiches in chocolate: Carefully dip each sandwich cookie into the melted chocolate, ensuring it is fully coated. Allow any excess chocolate to drip back into the bowl.
- Set the cookies: Place the dipped cookies on a sheet of waxed paper. Let them stand at room temperature for 30-60 minutes until the chocolate hardens completely.
- Store: Once hardened, store the mint sandwich cookies in an airtight container at room temperature for up to one week.
Notes
- Substitute gluten-free crackers to make the recipe gluten free.
- Semi-sweet or milk chocolate can be used instead of dark chocolate candy coating if preferred.
- Adjust peppermint extract quantity to suit your taste preferences.
- If green food coloring is omitted, the cookies will have a classic look without the green tint.
- For faster setting of chocolate, you may refrigerate the cookies but bringing them back to room temperature before serving is recommended for best texture.
- Store cookies in a cool, dry place away from direct sunlight to prevent chocolate from melting.


