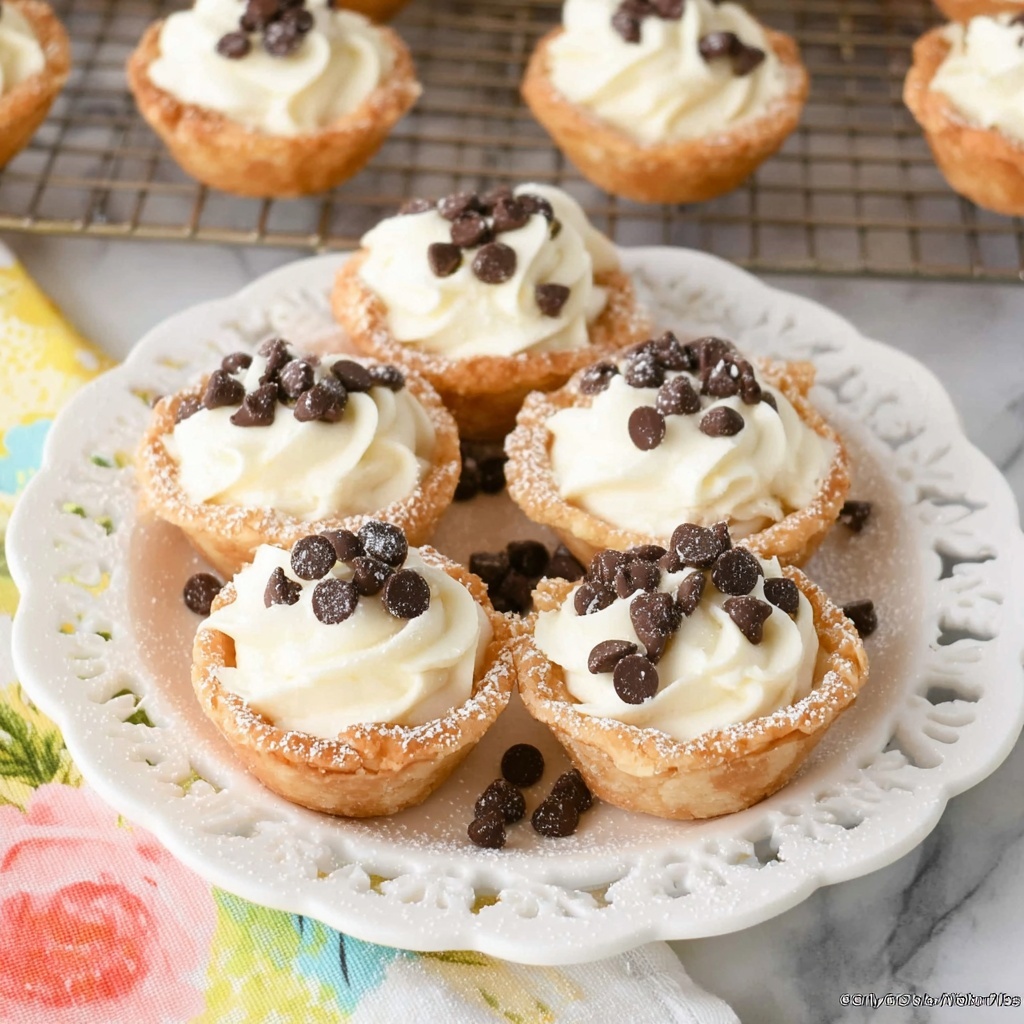
If you love the idea of that crisp, golden pastry shell paired with a luscious, creamy filling bursting with delicate citrus zest and just the right touch of sweetness, then this Mini Cannoli Cups Recipe is going to become your new favorite go-to dessert. These bite-sized delights bring all the charm of traditional cannoli in a perfectly handheld form that’s easy to make, fun to serve, and impossible to resist. Each crunchy cup cradles a velvety ricotta filling spiked with vanilla and brightened by orange or lemon zest, finished with a sprinkle of mini chocolate chips or pistachios — truly a treat that feels special yet comes together with such simple ingredients and straightforward steps.
Ingredients You’ll Need
Gathering the right ingredients is where the magic starts for this Mini Cannoli Cups Recipe. Each item plays a key role: the ricotta brings creamy richness, the citrus zest adds a fresh zing, and the pie crust transforms into the perfect crisp shell. Together they balance flavor, texture, and a lovely visual appeal.
- Whole-milk ricotta cheese (15 oz., drained): Choose high-quality ricotta for a smooth, rich filling.
- Powdered sugar (1/2 cup): Adds sweetness and lightens the texture of the filling.
- Granulated sugar (2 tablespoons): Sweetens and complements the cinnamon sugar crust.
- Orange or lemon zest (1 teaspoon, finely grated): Infuses the filling with a bright, aromatic citrus note.
- Vanilla extract (1/2 teaspoon): Enhances the creamy filling with warm, sweet undertones.
- Refrigerated pie crusts (2 count): These become the delightfully crisp mini cups; warming them slightly makes them easier to work with.
- Turbinado sugar (3 tablespoons): Used to sprinkle on the crust for a crunchy, sparkling finish.
- Ground cinnamon (1 teaspoon): Mixes with the turbinado sugar to add a cozy spice to the pastry cups.
- Miniature semisweet chocolate chips or finely chopped pistachios (1/4 cup): Perfect finishing touches that add texture and complementary flavors.
- Additional powdered sugar: For dusting right before serving to add a pretty snow-kissed look.
How to Make Mini Cannoli Cups Recipe
Step 1: Prepare the Oven and Pie Crusts
Start by preheating your oven to 425 degrees Fahrenheit. This high heat will help achieve those irresistibly golden, crisp cannoli cups. Next, lightly flour your work surface and unroll the pie crusts, preparing to transform them into the base for your mini desserts.
Step 2: Sugar and Spice the Dough
Sprinkle the pie crusts evenly with turbinado sugar and ground cinnamon. This combination not only brings sweetness but also a warm, inviting aroma and a subtle, crunchy texture once baked. Using a rolling pin, gently press these ingredients into the dough to ensure they stick well while baking.
Step 3: Cut and Shape the Cups
Using a 2½-inch round cookie or biscuit cutter, cut out circles from the pie crust. Then gently press each round into an ungreased mini muffin cup, shaping them into little cups. If you don’t get 48 from your first pass, simply reroll the leftover dough and continue cutting out circles until you reach 48 cups in total.
Step 4: Bake the Cups to Perfection
Place the mini muffin pan with the prepared dough cups into the oven and bake for 10 minutes or until they turn a beautiful golden brown. Once baked, allow the cannoli cups to cool completely in the pan for about 15 minutes before carefully transferring them to a wire rack to cool fully. This step is crucial to ensure crispness.
Step 5: Make the Creamy Filling
While your cups cool, it’s time for the irresistible filling. In a large mixing bowl, beat the drained ricotta, powdered sugar, granulated sugar, citrus zest, and vanilla extract on medium speed until you have a silky, creamy mixture. Transfer the filling into a gallon-sized zip-top bag, seal it tightly, and pop it into the fridge until you’re ready to assemble.
Step 6: Assemble Your Mini Cannoli Cups
Just before serving, take the filling out of the fridge, snip a tiny corner off the bag, and pipe about one tablespoon of creamy filling into each cooled pastry cup. Decorate the tops with a sprinkle of chocolate chips or chopped pistachios and finish with a light dusting of powdered sugar for that picture-perfect look.
How to Serve Mini Cannoli Cups Recipe
Garnishes
Think beyond just chocolate chips or pistachios—fresh mint leaves, edible flower petals, or a drizzle of honey can elevate these mini treats to stunning presentation pieces. These garnishes add color, aroma, and an extra dash of gourmet charm.
Side Dishes
These Mini Cannoli Cups Recipe delights pair beautifully with a freshly brewed espresso or a glass of sweet dessert wine. For a brunch or tea party, serve alongside fresh berries or a citrus fruit salad for a refreshing contrast to the rich, creamy cannoli filling.
Creative Ways to Present
Arrange your mini cannoli cups on a vintage tiered tray or a colorful ceramic platter, and sprinkle powdered sugar over the display at the last moment. For an extra festive touch, tie delicate ribbons around the mini muffin tin handles or serve them in decorative cupcake liners for easy grabbing at parties.
Make Ahead and Storage
Storing Leftovers
If you have any cannoli cups leftover, store the filling separately from the shells. Keep the shells in an airtight container at room temperature to prevent sogginess. The filling should be refrigerated in a sealed container or the zip-top bag used for piping.
Freezing
The baked cannoli cups freeze well if stored properly. Freeze them in a single layer on a baking sheet before transferring to a resealable bag or airtight container. When ready to enjoy, thaw at room temperature and pipe fresh filling in just before serving for the best texture.
Reheating
If your cannoli cups lose some crispness, a quick 3-5 minute warm-up in a 350°F oven can help re-crisp the shells. Avoid reheating filled cups to keep the creamy filling fresh and delicious.
FAQs
Can I use low-fat ricotta for the filling?
While low-fat ricotta can work, whole-milk ricotta is recommended for its creamier texture and richer flavor, which makes all the difference in this Mini Cannoli Cups Recipe.
How do I keep the cannoli cups from getting soggy?
Make sure to pipe the filling just before serving and store the fried shells separately. This prevents moisture from softening the crisp pastry cups.
Can I make these mini cannoli cups gluten-free?
Yes, substitute the refrigerated pie crust with a gluten-free pie crust option, but keep in mind texture differences may occur.
Are there any alternatives to the chocolate chips or pistachios for topping?
Absolutely! Crushed amaretti cookies, toasted coconut flakes, or even a sprinkle of chopped dried fruit can add delightful variations to the topping.
How long will the filled cannoli cups last?
Once filled, these mini cannoli cups are best enjoyed the same day but can be refrigerated for up to 24 hours. After this, the shells risk losing their crispness.
Final Thoughts
I hope you’re as excited as I am for you to try this Mini Cannoli Cups Recipe. It’s a wonderful way to delight family and friends with a classic Italian-inspired treat that’s both elegant and fun-sized. The balance of sweet, creamy filling and the crisp, cinnamon-sugar crusts truly makes these little cups addictive. So gather your ingredients, roll up your sleeves, and enjoy making a batch that’s sure to be a crowd-pleaser at any occasion.
Print
Mini Cannoli Cups Recipe
- Prep Time: 20 minutes
- Cook Time: 10 minutes
- Total Time: 45 minutes
- Yield: 48 servings
- Category: Dessert
- Method: Baking
- Cuisine: Italian-American
Description
Mini Cannoli Cups are a delightful Italian-inspired dessert featuring crispy baked pie crust cups filled with a creamy, sweet ricotta mixture, flavored with citrus zest and vanilla. Topped with mini chocolate chips or pistachios and a dusting of powdered sugar, these bite-sized treats offer an easy and elegant way to enjoy the classic flavors of cannoli in every crunchy, creamy mouthful.
Ingredients
Filling
- 1 container whole-milk ricotta cheese (15 oz., drained)
- 1/2 cup powdered sugar
- 2 tablespoons granulated sugar
- 1 teaspoon finely grated orange or lemon zest
- 1/2 teaspoon vanilla extract
Crust
- 1 box refrigerated pie crusts, softened as directed on box (2 count)
- 3 tablespoons turbinado sugar (raw sugar)
- 1 teaspoon ground cinnamon
Garnish
- 1/4 cup miniature semisweet chocolate chips or finely chopped pistachios
- Additional powdered sugar for dusting
Instructions
- Preheat the oven: Set your oven to 425°F to prepare for baking the crust cups.
- Prepare the crusts: Lightly flour a work surface and unroll the softened pie crusts. Sprinkle them evenly with turbinado sugar and cinnamon. Using a rolling pin, gently press the sugar and cinnamon into the dough to ensure an even coating. Use a 2½-inch round cookie or biscuit cutter to cut out pastry rounds. Press each round gently into ungreased mini muffin cups. If needed, re-roll the scraps and cut additional rounds until you have 48 cups.
- Bake the crust cups: Place the mini muffin pans in the oven and bake for 10 minutes or until the cups turn golden brown. Once baked, allow them to cool completely in the pans for about 15 minutes, then transfer to a wire rack to cool fully before filling.
- Make the filling: While the cups cool, combine the whole-milk ricotta cheese, powdered sugar, granulated sugar, finely grated citrus zest, and vanilla extract in a large mixing bowl. Using an electric mixer on medium speed, beat until the mixture is smooth and creamy. Transfer the filling to a 1-gallon zip-top resealable bag, seal, and refrigerate until ready to use.
- Fill the cups: Just before serving, remove the filling from the refrigerator. Snip off one corner of the bag and pipe about 1 tablespoon of the filling into each cooled pastry cup.
- Garnish and serve: Sprinkle the filled cups with miniature semisweet chocolate chips or finely chopped pistachios. Dust the tops lightly with additional powdered sugar and serve immediately for best texture and flavor.
Notes
- Ensure the ricotta cheese is well-drained to prevent a watery filling.
- You can substitute lemon zest for orange zest depending on your flavor preference.
- Pastry cups should be completely cool before filling to avoid sogginess.
- Prepare the filling ahead, but fill cups just before serving to maintain crunchiness.
- Leftover filling can be refrigerated and used within 1-2 days.
