
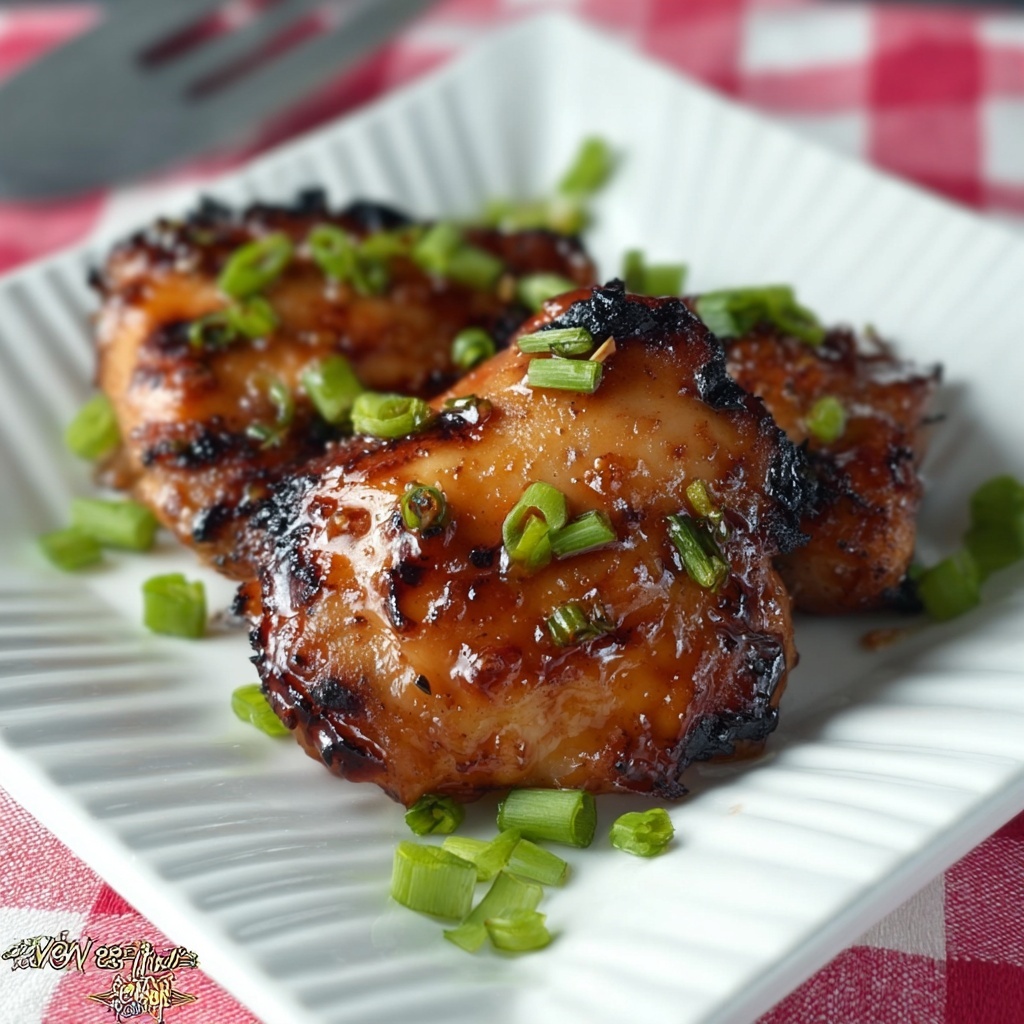
If you crave a dish that’s bursting with bold, sweet-savory flavors and irresistibly tender meat, you are going to adore this Baked Teriyaki Chicken Thighs Recipe. This recipe is a celebration of simplicity and depth, combining a homemade teriyaki sauce that perfectly glazes juicy chicken thighs baked to tender perfection. It’s an accessible dish that can transform any weeknight dinner into a delightful, restaurant-quality experience, all from the comfort of your kitchen.

Ingredients You’ll Need
Each ingredient in this recipe plays a crucial role, bringing balance and richness to the dish. These simple but essential ingredients weave together to deliver that signature teriyaki taste, texture, and vibrant color that makes this recipe so special.
- 2 pounds chicken thighs (boneless, skinless): These juicy thighs are perfect for soaking up the marinade and staying tender during baking.
- ½ cup soy sauce: The salty, umami foundation that gives the teriyaki sauce its depth.
- ¼ cup mirin: Adds a subtly sweet and tangy touch, enhancing the overall flavor profile.
- 3 tablespoons light brown sugar: Brings caramel-like sweetness that beautifully balances the soy’s saltiness.
- 1 teaspoon sesame oil: A tiny amount offers a nutty aroma that never fails to make the dish more aromatic.
- 2 garlic cloves (minced): Fresh garlic provides a bright, pungent kick to the sauce.
- 1 teaspoon fresh ginger (grated): Adds warmth and a subtle spicy note, perfect for contrast.
- 1 tablespoon cornstarch mixed with 2 tablespoons water (slurry): Thickens the teriyaki sauce to a luscious glaze that clings to the chicken.
- Green onions (sliced for garnish): Provides a fresh, crisp bite and a pop of green.
- Sesame seeds (for garnish): Adds texture and a toasty nutty flavor, tying together the dish’s presentation.
How to Make Baked Teriyaki Chicken Thighs Recipe
Step 1: Prepare the Teriyaki Sauce
Start by combining soy sauce, mirin, light brown sugar, sesame oil, minced garlic, and grated ginger in a small saucepan. Heat this over medium heat, stirring occasionally until the mixture just starts to simmer. This blend is where the magic begins — the aroma filling your kitchen hints at the deliciousness ahead.
Step 2: Thicken the Sauce
Next, stir in the cornstarch slurry and cook for another 1 to 2 minutes, watching as the sauce thickens into a silky, glossy glaze. Then, remove the pan from heat and allow the sauce to cool completely, so that it’s perfect for marinating and basting the chicken.
Step 3: Marinate the Chicken
Place the chicken thighs into a large bowl or a resealable plastic bag and pour half of the cooled teriyaki sauce over them. Hold back the other half for later basting and serving. Toss everything together until the chicken is thoroughly coated. Let it marinate in the refrigerator for 20 to 30 minutes to soak up all those wonderful flavors.
Step 4: Prepare to Bake
While the chicken marinates, preheat your oven to 400°F (200°C). Line a baking sheet with aluminum foil and lightly grease it to prevent sticking — this makes cleanup a breeze and keeps the chicken’s skin deliciously crisp.
Step 5: Bake the Chicken
Arrange the marinated chicken thighs on your prepared baking sheet, shaking off any excess marinade to avoid sogginess. Bake for 25 to 30 minutes, flipping the chicken halfway through to ensure it cooks evenly and reaches an internal temperature of 165°F (74°C). This step guarantees a juicy, tender bite every time.
Step 6: Glaze and Caramelize
During the last 5 minutes of baking, generously brush the chicken with some of the reserved teriyaki sauce. Switch your oven to broil and cook for an additional 2 to 3 minutes. Keep a close eye here as the sauce caramelizes, creating that mouthwatering glossy finish with just the right amount of stickiness and a hint of char.
Step 7: Rest and Garnish
Once out of the oven, let your chicken rest for about 5 minutes. This step locks in the juices and intensifies flavor before serving. Top your Baked Teriyaki Chicken Thighs with sliced green onions and a sprinkle of sesame seeds for a fresh, nutty final touch that makes the dish as beautiful as it tastes.
How to Serve Baked Teriyaki Chicken Thighs Recipe
Garnishes
Adding sliced green onions and sesame seeds not only enhances the visual appeal but also introduces a delightful textural contrast. For an extra pop, consider a light drizzle of extra teriyaki sauce or a sprinkle of crushed red pepper flakes if you like a bit of heat.
Side Dishes
This dish pairs wonderfully with steamed jasmine rice or fluffy brown rice to soak up all that sticky sauce. For added veggies, try a fresh Asian-inspired slaw, sautéed bok choy, or garlic green beans to keep the meal vibrant and balanced.
Creative Ways to Present
For a fun twist, serve the chicken over a bed of cauliflower rice or use it to top a crisp salad for a lighter option. You could also slice the chicken and serve it in bao buns or lettuce wraps for an interactive and delicious feast that guests will love.
Make Ahead and Storage
Storing Leftovers
Leftover Baked Teriyaki Chicken Thighs can be kept in an airtight container in the refrigerator for up to 3 days. Making sure the chicken is cooled properly before refrigerating helps maintain its juicy texture and flavor.
Freezing
If you want to save it for later, freeze the cooked chicken in a freezer-safe container or bag for up to 2 months. Thaw overnight in the fridge before reheating to preserve the best taste and texture.
Reheating
Reheat leftovers gently in a skillet over medium-low heat with a splash of water or additional teriyaki sauce to keep the chicken moist. Alternatively, microwave in short intervals, covered, to prevent drying out while warming evenly.
FAQs
Can I use chicken breasts instead of thighs?
Absolutely! While chicken thighs provide more juiciness and flavor, you can substitute boneless, skinless chicken breasts. Just be mindful that breasts cook faster and can dry out if overbaked, so adjust cooking time accordingly.
Is mirin necessary in the teriyaki sauce?
Mirin adds a distinct sweet tang and depth to the sauce, but if you don’t have it on hand, a combination of sake and sugar or even a little honey can be a good substitute. Keep in mind this may alter the flavor slightly.
How sticky will the glaze be after baking?
The glaze finishes with a delightful, glossy stickiness that clings to the chicken. The broil step caramelizes the sugars just enough to create that signature teriyaki sheen and texture without being overly sticky or syrupy.
Can I make this recipe gluten-free?
Yes! Use a gluten-free soy sauce, like tamari, and double-check the mirin or substitutes you choose to ensure they are gluten-free. This simple swap keeps all the delicious flavors safe for gluten-sensitive diners.
What’s the best way to check if the chicken is done?
Using a meat thermometer is the most reliable method—the internal temperature should reach 165°F (74°C). This guarantees the chicken is fully cooked yet still juicy and tender.
Final Thoughts
This Baked Teriyaki Chicken Thighs Recipe is one of those dishes that quickly becomes a favorite because it’s straightforward, packed with incredible flavor, and versatile enough for any occasion. Whether you’re cooking for your family or friends, this recipe promises a delicious meal that will leave everyone asking for seconds. Give it a try, and I’m sure it’ll find a happy spot on your dinner rotation!
Print
Baked Teriyaki Chicken Thighs Recipe
- Prep Time: 15 minutes
- Cook Time: 35 minutes
- Total Time: 50 minutes
- Yield: 4 servings
- Category: Main Course
- Method: Baking
- Cuisine: Japanese
Description
This Baked Teriyaki Chicken Thighs recipe delivers tender, juicy chicken coated in a sweet and savory homemade teriyaki glaze. Marinated and baked to perfection, the chicken is finished under the broiler for a caramelized, sticky glaze topped with fresh green onions and sesame seeds, making it a flavorful and easy weeknight dinner.
Ingredients
Chicken
- 2 pounds chicken thighs (boneless, skinless)
Teriyaki Sauce
- ½ cup soy sauce
- ¼ cup mirin
- 3 Tablespoons light brown sugar
- 1 teaspoon sesame oil
- 2 garlic cloves (minced)
- 1 teaspoon fresh ginger (grated)
- 1 Tablespoon cornstarch mixed with 2 tablespoons water (slurry)
Garnish
- Green onions (sliced)
- Sesame seeds
Instructions
- Make the Teriyaki Sauce: In a small saucepan, combine the soy sauce, mirin, brown sugar, sesame oil, minced garlic, and grated ginger. Heat over medium heat, stirring occasionally, until the mixture begins to simmer.
- Thicken the Sauce: Stir in the cornstarch slurry and cook for 1-2 minutes, until the sauce thickens and becomes glossy. Remove from heat and allow the sauce to cool completely.
- Marinate the Chicken: Place the chicken thighs in a large bowl or resealable plastic bag. Pour half of the cooled teriyaki sauce over the chicken, reserving the rest for basting and serving. Toss to coat the chicken evenly, then cover and refrigerate for 20-30 minutes.
- Preheat Oven and Prepare Baking Sheet: While the chicken marinates, preheat your oven to 400°F (200°C). Line a baking sheet with aluminum foil and lightly grease it with cooking spray.
- Bake the Chicken: Arrange the marinated chicken thighs on the prepared baking sheet, shaking off excess marinade. Bake for 25-30 minutes, flipping halfway through, until the internal temperature reaches 165°F (74°C).
- Broil for Caramelization: In the last 5 minutes of baking, brush the chicken with reserved teriyaki sauce. Switch the oven to broil and cook for 2-3 minutes until the sauce caramelizes and the chicken develops a sticky, glossy finish. Watch carefully to prevent burning.
- Rest and Garnish: Remove the chicken from the oven and let it rest for 5 minutes. Garnish with sliced green onions and sesame seeds before serving. Enjoy your flavorful baked teriyaki chicken!
Notes
- For extra flavor, marinate the chicken overnight if time allows.
- You can use bone-in, skin-on chicken thighs, but adjust baking time accordingly.
- Use gluten-free soy sauce to make this recipe gluten-free.
- If you prefer a thicker glaze, add a little more cornstarch slurry when cooking the sauce.
- Watch the broiler closely to avoid burning the sauce during caramelization.


