
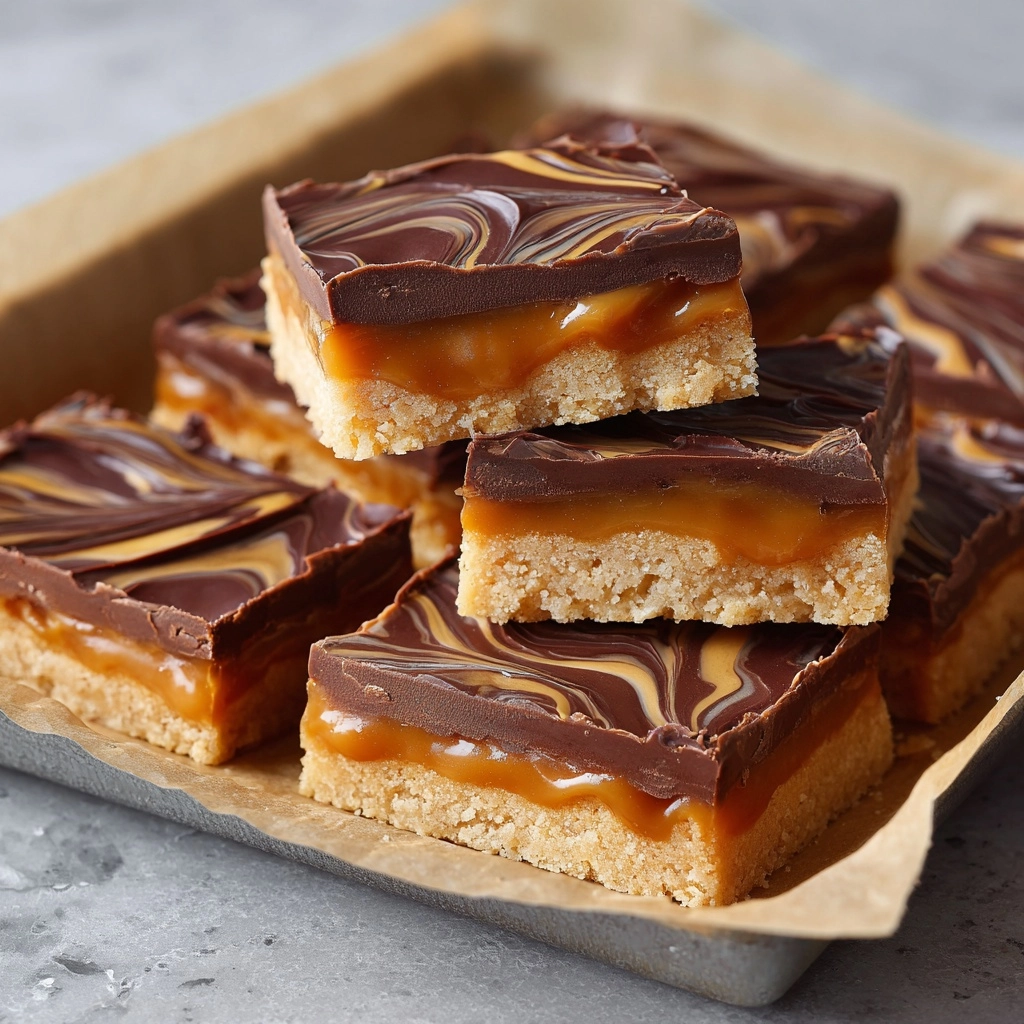
There’s something utterly magical about making Homemade Twix Bars in your own kitchen—just imagine a crisp, buttery shortbread topped with silky caramel and crowned with a thick layer of melty milk chocolate. Every bite delivers the iconic Twix experience, but elevated with fresh, real ingredients and that unmistakable homemade love. Whether you’re baking for friends, prepping a sweet treat for the family, or recreating your favorite store-bought candy bar from scratch, these homemade Twix bars will win hearts and disappear faster than you thought possible!
Ingredients You’ll Need
The beauty of homemade Twix bars is in their simplicity—every ingredient here plays a starring role in crafting the perfect bite. Gather these staples and get ready for an irresistible treat you’ll want to make again and again!
- Unsalted Butter: Gives the shortbread its richness and tender, melt-in-your-mouth crumb—use high-quality butter for best flavor.
- Powdered Sugar: Sweetens the shortbread and delivers that soft, tender texture you expect in a classic Twix bar base.
- All-Purpose Flour: Forms the structure of the shortbread; be sure to measure it gently so your bars stay delicate.
- Salt: Just a pinch balances out all the sweetness and brings out the flavor in every layer.
- Caramel Candies or Soft Caramels: These melt down into a luscious, gooey caramel—choose a quality brand for the richest, most authentic flavor.
- Heavy Cream: Mixed with the caramels, this ensures your caramel layer is velvety smooth and never chewy or hard.
- Milk Chocolate Chips or Chopped Milk Chocolate: For that classic Twix finish, melt these into a glossy, decadent chocolate topping.
- Coconut Oil or Vegetable Oil (optional): A teaspoon of this in your melted chocolate makes it extra smooth and easy to slice.
How to Make Homemade Twix Bars
Step 1: Prepare the Pan and Preheat
Start by lining an 8×8-inch baking pan with parchment paper, making sure you leave enough overhang for easy removal later. Preheat your oven to 350°F—the perfect temp for baking the shortbread to golden perfection while keeping it tender inside.
Step 2: Mix the Shortbread Dough
In a large mixing bowl, cream together the softened butter and powdered sugar until the mixture is light and fluffy. This is your foundation for dreamy shortbread! Next, add in the flour and salt, mixing just until a soft dough forms—don’t overmix or the base might turn out tough instead of delicate.
Step 3: Press and Bake the Shortbread
Press the dough evenly into the bottom of your prepared pan, using your fingertips or the bottom of a measuring cup for a really even layer. Slide it right into the oven and bake for 18–20 minutes, or until those edges start to turn a beautiful light golden brown. Let the pan cool completely before you start on the next layer; patience is key so you don’t melt the caramel too soon!
Step 4: Melt and Spread the Caramel
Pop your caramel candies and heavy cream into a microwave-safe bowl. Microwave in 30-second bursts, stirring in between, until everything is totally melted and silky smooth. Pour the molten caramel over your cooled shortbread, spreading to the edges. Then pop the pan in the fridge for at least 30 minutes to help the caramel set up nice and thick.
Step 5: Make the Chocolate Topping
For that signature chocolate finish, melt the milk chocolate chips (or chopped chocolate) with the coconut oil in 30-second intervals in the microwave, stirring until everything is glossy and lump-free. Pour the chocolate over the chilled caramel layer and gently smooth it out with an offset spatula. Back into the fridge it goes, this time for at least an hour until everything is fully set and ready to slice.
Step 6: Cut and Enjoy
Using the parchment paper overhang for leverage, gently lift the entire block from the pan. Slice into classic Twix-style fingers or big, bold squares—either way, these homemade Twix bars are ready to steal the spotlight at any dessert table!
How to Serve Homemade Twix Bars

Garnishes
Dress up your homemade Twix bars with a sprinkle of flaky sea salt across the chocolate for a luscious salty-sweet bite. A light drizzle of white chocolate or a scattering of toasted chopped nuts brings extra flair while keeping the bars totally irresistible.
Side Dishes
These decadent bars pair well with a scoop of vanilla bean ice cream, a cup of hot coffee, or a glass of cold milk. For a dessert platter, try serving them alongside fresh berries or tart apple slices to balance out all that creamy richness.
Creative Ways to Present
Turn your homemade Twix bars into a showstopping gift by wrapping them in wax paper and tying with a ribbon. Or cube them up and scatter over cupcakes, ice cream sundaes, or even a party snack tray—no one will guess how easy they were to make!
Make Ahead and Storage
Storing Leftovers
Your homemade Twix bars will stay freshest when you store them in an airtight container in the fridge. This keeps the chocolate and caramel layers perfectly set and makes for tidy, clean cuts (plus, they taste divine cold!).
Freezing
If you want to save some for a later sweet tooth emergency, tightly wrap the bars in plastic wrap and tuck them into a freezer-safe bag or container. They freeze beautifully for up to one month—just let them thaw a bit at room temp before diving in.
Reheating
No need to zap these in the microwave! If your bars are super firm straight from the fridge or freezer, simply let them sit at room temperature for 10–15 minutes. That’s all it takes for the caramel to soften and the chocolate to regain its lovely bite.
FAQs
Can I use dark chocolate instead of milk chocolate?
Absolutely! If you love a deeper, more bittersweet flavor in your homemade Twix bars, swap in dark chocolate chips for a grown-up twist on the classic.
Are there any shortcuts for the caramel layer?
If you’re pressed for time, you can use store-bought caramel sauce, but be sure to pick one that’s thick and creamy, not runny, or it might not set up as well.
How do I get the cleanest slices?
For picture-perfect bars, chill thoroughly and use a sharp knife warmed under hot water (then dried). This helps cut neatly through the chocolate without cracking.
Can these be made gluten-free?
Yes! Replace the all-purpose flour with your favorite 1:1 gluten-free flour blend. The results are just as delicious and the texture is still spot-on.
Do homemade Twix bars travel well?
They do! Pack them in a snug container with parchment between layers, keep them cool, and they’ll arrive at your picnic or party in perfect shape—just be mindful of heat if transporting during summer.
Final Thoughts
Few things beat the delight of biting into one of these homemade Twix bars—each layer is an invitation to indulge and enjoy. Don’t be surprised if they vanish from the plate before you even put the kettle on. Go ahead, treat yourself and your loved ones to a batch—and experience homemade magic that rivals the original!
Print
Homemade Twix Bars Recipe
- Prep Time: 20 minutes
- Cook Time: 20 minutes
- Total Time: 1 hour 40 minutes (including chilling)
- Yield: 16 bars
- Category: Dessert
- Method: No-Bake + Baking
- Cuisine: American
- Diet: Vegetarian
Description
Indulge in the rich, buttery goodness of these Homemade Twix Bars. A layer of shortbread is topped with gooey caramel and luscious milk chocolate, creating a delightful treat reminiscent of the classic candy bar.
Ingredients
Shortbread Base:
- 1 cup unsalted butter, softened
- ½ cup powdered sugar
- 2 cups all-purpose flour
- ¼ teaspoon salt
Caramel Layer:
- 1 cup caramel candies or soft caramels
- 2 tablespoons heavy cream
Chocolate Coating:
- 1½ cups milk chocolate chips or chopped milk chocolate
- 1 teaspoon coconut oil or vegetable oil (optional, for smoother chocolate)
Instructions
- Preheat the oven: Preheat the oven to 350°F and line an 8×8-inch baking pan with parchment paper, leaving overhang on the sides.
- Prepare the shortbread: Cream together butter and powdered sugar, then add flour and salt to make a dough. Press into pan and bake until golden.
- Make the caramel: Melt caramel candies with heavy cream and spread over the cooled shortbread.
- Add chocolate layer: Melt chocolate with coconut oil, pour over the caramel, and chill until set.
- Serve: Lift bars from the pan using the parchment overhang and cut into squares or fingers.
Notes
- Use high-quality chocolate and caramels for best results.
- Store bars in the fridge for clean cuts.
- Let bars sit at room temperature for 10 minutes before serving for a softer texture.
- Bars can be frozen for up to 1 month.
Nutrition
- Serving Size: 1 bar
- Calories: 260
- Sugar: 20g
- Sodium: 90mg
- Fat: 16g
- Saturated Fat: 10g
- Unsaturated Fat: 5g
- Trans Fat: 0g
- Carbohydrates: 28g
- Fiber: 1g
- Protein: 2g
- Cholesterol: 25mg


