
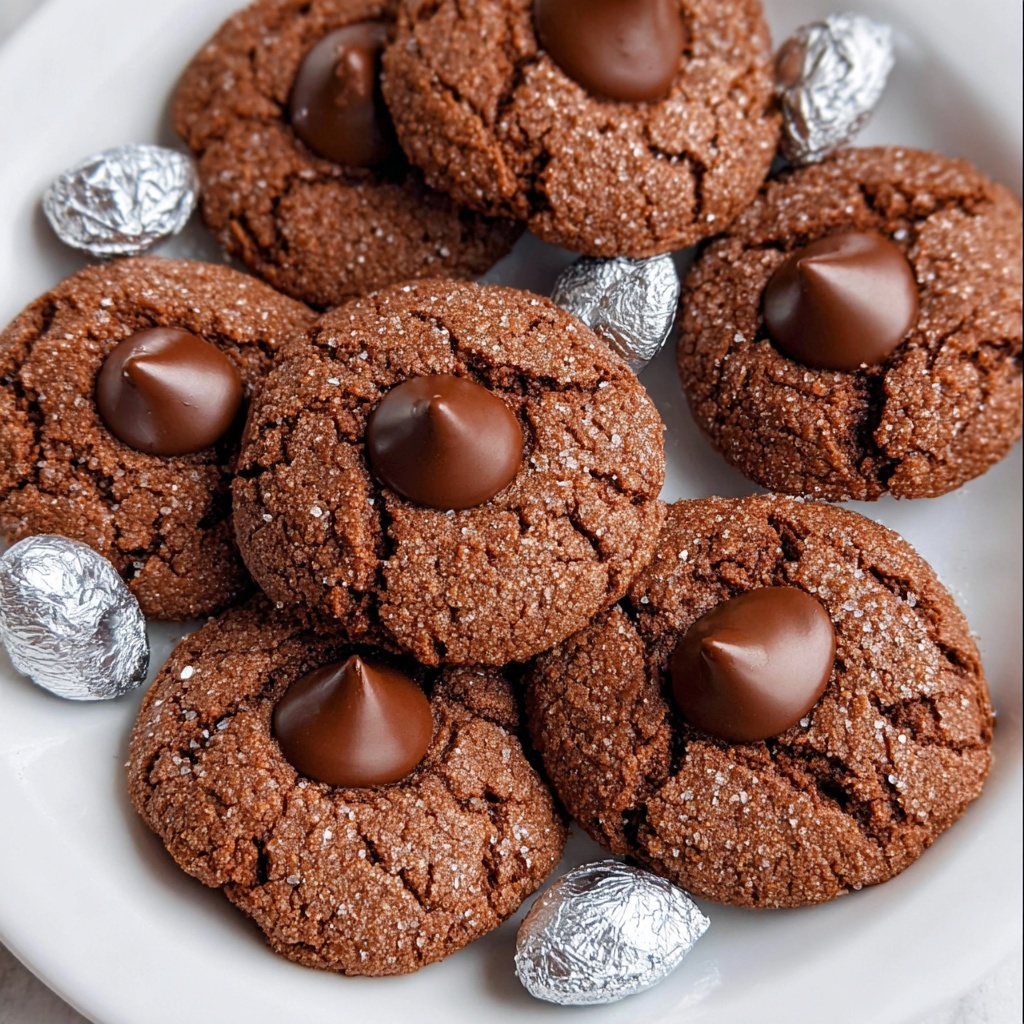
If you are on the hunt for a cozy, chocolatey treat that brings a burst of joy with every bite, look no further than this delightful Chocolate Kiss Cookies Recipe. Soft, fudgy, and crowned with a classic Hershey’s Kiss, these cookies combine that perfect balance of rich cocoa flavor and a hint of sweetness that’s simply irresistible. Whether it’s a holiday gathering or a casual snack time, these cookies are a guaranteed crowd-pleaser, delivering comfort and happiness in every single morsel.

Ingredients You’ll Need
This Chocolate Kiss Cookies Recipe uses simple, pantry-friendly ingredients that come together to create magic in your oven. Each component plays a key role in achieving the perfect taste, texture, and color, from the creamy butter to the rich cocoa powder.
- 1 cup unsalted butter (2 sticks, softened): Provides a creamy base and rich texture that makes these cookies melt in your mouth.
- 1 cup granulated sugar (plus extra for rolling): Adds sweetness and helps create that desirable slight crunch on the outside.
- ½ cup brown sugar (packed): Infuses the cookies with moisture and a subtle caramel depth.
- 1 large egg: Binds all the ingredients together while adding a little lift.
- 1 egg yolk: Enhances richness and gives the cookies a tender crumb.
- 2 teaspoons vanilla extract: Brightens the chocolate flavor with lovely aromatic notes.
- 2 cups all-purpose flour: The structure-builder that holds everything just right.
- ½ cup unsweetened cocoa powder: The heart of this recipe, delivering deep, chocolaty goodness without overwhelming sweetness.
- 1 teaspoon baking soda: Helps the cookies rise gently and achieve a soft, chewy texture.
- ½ teaspoon salt: Balances the sweetness and intensifies the chocolate flavor.
- 30 Hershey’s Kisses (unwrapped): The signature touch that melts into the cookie tops, creating a delightful duo.
- Holiday sprinkles (optional): Adds festive color and extra fun if you like a bit of crunch and cheeriness.
How to Make Chocolate Kiss Cookies Recipe
Step 1: Prep Your Oven and Pans
Start by preheating your oven to 350°F (175°C). Line your baking sheets with parchment paper to prevent sticking and make for easier cleanup. This simple step sets you up for baking success and ensures your cookies come out perfectly every time.
Step 2: Cream Butter and Sugars
In a large bowl, beat your softened butter together with the granulated sugar and brown sugar until the mixture is light, creamy, and fluffy. This base mix is what makes the cookies tender and gives them that irresistible melt-in-your-mouth texture.
Step 3: Add Eggs and Vanilla
Next, whisk in the egg, egg yolk, and vanilla extract until fully combined. These ingredients add moisture and boost flavor, ensuring each bite has rich, smooth undertones.
Step 4: Combine Dry Ingredients
In a separate bowl, sift together the all-purpose flour, cocoa powder, baking soda, and salt. Whisking them helps remove lumps and ensures even distribution, resulting in a consistent dough and beautifully baked cookies.
Step 5: Blend Dry Ingredients into Wet
Gradually add the dry ingredients to your wet mixture, stirring gently until a soft dough forms. Be careful not to overmix; you want the dough to stay tender and not turn tough.
Step 6: Chill the Dough
Cover the dough bowl with plastic wrap and refrigerate it for 15-20 minutes. Chilling firms up the dough, making it easier to shape and helping the cookies keep their shape while baking.
Step 7: Shape and Coat the Dough Balls
Once the dough is chilled, scoop about 1 tablespoon of dough and roll it into balls. Then, roll each one in granulated sugar for a subtle sparkle. If you want to add festive cheer, substitute some sugar with holiday sprinkles—a fun way to add color and texture.
Step 8: Bake the Cookies
Arrange your sugar-coated dough balls evenly spaced on the parchment-lined baking sheets. Bake for 8-10 minutes, looking for firm edges and soft centers. Keep an eye on them to prevent overbaking—this ensures they stay perfectly chewy inside.
Step 9: Add the Kisses
Immediately after pulling the cookies from the oven, gently press an unwrapped Hershey’s Kiss into the center of each cookie. The cookies might crack a bit around the edges, which is totally normal and part of their charm.
Step 10: Cool and Enjoy
Allow the cookies to cool on the baking sheets for 5 minutes before transferring them to a wire rack to cool completely. This prevents the chocolate from melting off and gives the cookies time to set to perfection. Then, dig in and savor the delicious magic of homemade Chocolate Kiss Cookies Recipe!
How to Serve Chocolate Kiss Cookies Recipe
Garnishes
While the classic chocolate kiss atop each cookie is a perfect finishing touch, you can take them a step further by sprinkling a pinch of flaky sea salt or adding a light dusting of powdered sugar. These simple garnishes bring an unexpected layer of flavor and make your cookies look extra special.
Side Dishes
Pair these Chocolate Kiss Cookies with a cold glass of milk for a nostalgic experience or serve alongside a warm cup of coffee or rich hot chocolate. Each sip complements the rich chocolate flavor, turning your snack into a moment of pure indulgence.
Creative Ways to Present
For parties or gift-giving, arrange your cookies in a decorative tin or tie small bundles with festive ribbons. You can also place individual cookies in clear cellophane bags with a personalized tag for a thoughtful homemade gift. Presentation makes these already charming cookies even more delightful to share!
Make Ahead and Storage
Storing Leftovers
Keep any leftover cookies in an airtight container at room temperature for up to a week. This will preserve their luscious texture and maintain that perfect chocolatey melt with just enough softness.
Freezing
If you want to make these ahead for a special occasion, feel free to freeze the baked cookies. Simply place them in a single layer on a baking sheet, freeze until firm, then transfer to a sealed freezer container. They’ll keep well for up to three months and thaw beautifully.
Reheating
To bring your stored or frozen cookies back to life, warm them briefly in a preheated oven at 300°F for 5-7 minutes. This revives the softness and slightly melts the chocolate kiss for that irresistible gooey finish.
FAQs
Can I use different types of chocolate instead of Hershey’s Kisses?
Absolutely! While Hershey’s Kisses are traditional and super convenient, you can swap in chocolate chips or small pieces of your favorite chocolate bar. Dark, milk, or even flavored chocolates like mint or caramel will all add delicious twists.
What if I don’t have cocoa powder? Can I substitute it?
Cocoa powder is key for that deep chocolate flavor and texture, but if you don’t have it, you can try melted chocolate, though you’ll need to adjust the amount of flour and butter to balance moisture. For best results, grab some unsweetened cocoa powder for this recipe.
Why do I need to chill the dough before baking?
Chilling helps the dough firm up, which prevents the cookies from spreading too much in the oven. It also allows flavors to meld and results in a better chewy texture, so this step is definitely worth the wait.
Can I make these cookies gluten-free?
Yes! Swap out the all-purpose flour for a gluten-free flour blend designed for baking. Just ensure it contains xanthan gum or another binding agent to mimic the texture gluten provides, and your cookies will turn out just as delicious.
How do I make the cookies more festive for holidays?
Besides rolling the dough in holiday sprinkles, you can add festive-colored sugar crystals or mini edible glitter on top of the kisses once baked. Presentation matters, and these small touches can turn your Chocolate Kiss Cookies Recipe into a centerpiece of any celebration.
Final Thoughts
This Chocolate Kiss Cookies Recipe is honestly one of those kitchen treasures that feels like a warm hug on a plate. From the simple ingredients to the easy steps, it’s perfect for bakers of all levels who want to spread a little joy with every batch. I can’t wait for you to try these and make some sweet memories along the way!
Print
Chocolate Kiss Cookies Recipe
- Prep Time: 20 minutes
- Cook Time: 10 minutes
- Total Time: 30 minutes
- Yield: 30 cookies
- Category: Dessert
- Method: Baking
- Cuisine: American
Description
Delight in these rich and fudgy Chocolate Kiss Cookies topped with a classic Hershey’s Kiss. Soft in the center with a slight crunch on the edges, these cookies combine the deep flavor of cocoa with a sweet, melt-in-your-mouth chocolate center, making them perfect for holiday treats or any special occasion.
Ingredients
Cookie Dough
- 1 cup unsalted butter (2 sticks, softened)
- 1 cup granulated sugar (plus extra for rolling)
- ½ cup brown sugar (packed)
- 1 large egg
- 1 egg yolk
- 2 teaspoons vanilla extract
- 2 cups all-purpose flour
- ½ cup unsweetened cocoa powder
- 1 teaspoon baking soda
- ½ teaspoon salt
Topping
- 30 Hershey’s Kisses (unwrapped)
- Holiday sprinkles (optional)
Instructions
- Preheat Oven: Preheat your oven to 350°F (175°C) and line baking sheets with parchment paper to prevent sticking and ensure even baking.
- Mix Wet Ingredients: In a large bowl, beat the softened butter, granulated sugar, and brown sugar together until the mixture is light and creamy. Then add the egg, egg yolk, and vanilla extract, mixing until everything is fully blended.
- Combine Dry Ingredients: In a separate bowl, whisk together the flour, cocoa powder, baking soda, and salt until well combined.
- Form Dough: Gradually add the dry ingredients to the wet ingredients, mixing until a soft dough forms. Be careful not to overmix.
- Chill Dough: Cover the bowl with plastic wrap and chill the dough in the refrigerator for 15-20 minutes to firm up, making it easier to handle.
- Shape Cookies: Once chilled, scoop about 1 tablespoon of dough and roll it into a ball. Repeat with the remaining dough.
- Roll in Sugar or Sprinkles: Roll each dough ball in granulated sugar. For variety, you may roll some in holiday sprinkles instead.
- Arrange on Baking Sheets: Place the dough balls on the prepared baking sheets, spacing them about 2 inches apart to allow for spreading.
- Bake Cookies: Bake in the preheated oven for 8-10 minutes, or until the edges are set and firm but the centers still appear slightly soft.
- Add Hershey’s Kisses: Immediately after removing the cookies from the oven, press one unwrapped Hershey’s Kiss into the center of each cookie. It’s normal if the cookies crack slightly around the edges.
- Cool: Allow the cookies to cool on the baking sheet for 5 minutes before transferring them to a wire rack to cool completely. Serve and enjoy!
Notes
- Chilling the dough is key to keeping the cookies from spreading too much and helps achieve the perfect chewy texture.
- You can substitute the Hershey’s Kisses with other chocolates or candies if desired.
- For a festive touch, roll some dough balls in sprinkles or colored sugar instead of plain granulated sugar.
- Store cookies in an airtight container at room temperature for up to one week.


