
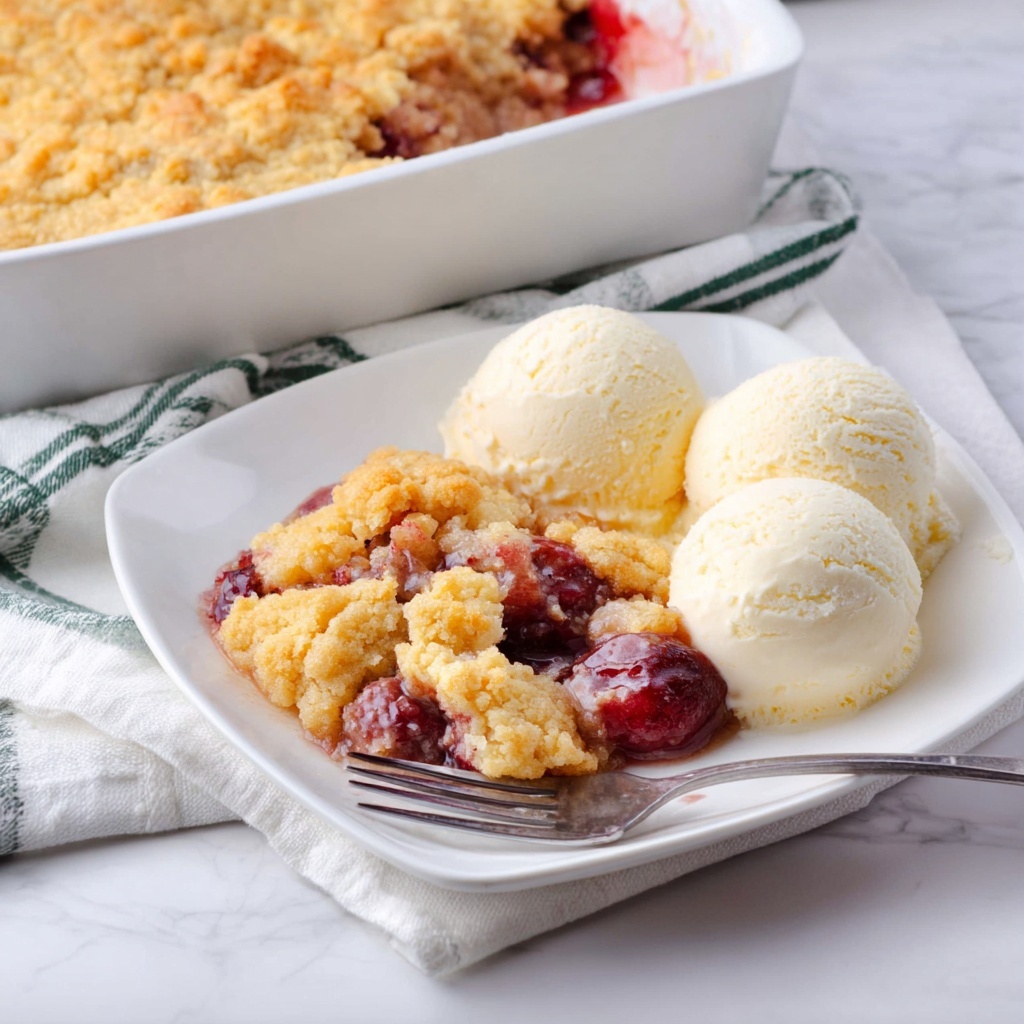
If you are looking for a delightfully easy dessert that bursts with vibrant flavors and requires minimal effort, you will love this Cherry Pineapple Dump Cake Recipe. It perfectly balances the tartness of cherries with the luscious sweetness of pineapple, all topped with a buttery, golden crust that is simply irresistible. Whether you’re making a weeknight treat or a crowd-pleaser for gatherings, this dump cake is a charming, no-fuss way to impress everyone without spending hours in the kitchen.
Ingredients You’ll Need
Every ingredient in this Cherry Pineapple Dump Cake Recipe plays a crucial role in creating that perfect harmony of taste and texture. They are all simple pantry staples, yet when combined, they transform into a dessert that feels like a special occasion. From the juicy fruits to the rich butter and the tender cake topping, each element is essential.
- 20 ounce can crushed pineapple (undrained): Adds juicy sweetness and moisture, keeping the cake deliciously tender.
- 21 ounce can cherry pie filling: Provides a pop of tart cherry flavor and a beautiful red hue that makes this dessert so inviting.
- 1 box yellow cake mix: Creates a light, crumbly topping that crisps up perfectly in the oven.
- 1 1/2 sticks butter (sliced): Melts down to give the topping a rich, golden finish that’s full of buttery goodness.
How to Make Cherry Pineapple Dump Cake Recipe
Step 1: Preheat Your Oven
Start by warming up your oven to 350 degrees Fahrenheit. This ensures it’s hot and ready right when you assemble your dump cake, helping you bake it to that perfect golden crisp without any delay.
Step 2: Prepare Your Baking Dish
Grab a 9×13-inch glass baking dish and spray the bottom lightly with non-stick cooking spray. This little step keeps the cake from sticking and makes clean-up much easier.
Step 3: Layer the Fruit
Pour the entire can of crushed pineapple, with juice included, into the baking dish. Next, spoon the cherry pie filling evenly on top. These juicy layers create a flavorful base that will bubble up beautifully beneath the cake mix.
Step 4: Sprinkle the Cake Mix
Evenly sprinkle the dry yellow cake mix over the fruit layers. This delicate layer works as the cake’s top crust, absorbing the fruit juices below and baking up perfectly soft on the inside with a slight crunch on top.
Step 5: Add the Butter
Distribute the sliced butter evenly across the surface of the cake mix. The butter melts slowly while baking, enriching the topping with a luscious, golden finish and adding a wonderful richness to every bite.
Step 6: Bake Until Golden and Bubbling
Place your dish in the preheated oven and bake for 40 to 45 minutes. You’ll know it’s ready when the top is beautifully golden brown and you can see the fruit mixture bubbling around the edges. Let it cool slightly before serving so the layers set perfectly.
How to Serve Cherry Pineapple Dump Cake Recipe

Garnishes
While this dump cake is amazing on its own, adding a scoop of creamy vanilla ice cream or a dollop of whipped cream on top takes it to a whole new level of indulgence. Fresh mint leaves also brighten the presentation and add a touch of freshness.
Side Dishes
This Cherry Pineapple Dump Cake Recipe pairs beautifully with a hot cup of coffee or a glass of cold milk for a comforting treat. For a brunch or potluck, serve it alongside lighter fruit salads to balance the richness.
Creative Ways to Present
Try serving the cake in individual ramekins for a charming single-serving surprise. Alternatively, you can layer it in a trifle dish with whipped cream and fresh cherries for an elegant presentation that’s sure to wow your guests.
Make Ahead and Storage
Storing Leftovers
After the Cherry Pineapple Dump Cake has cooled, cover it tightly with plastic wrap or transfer leftovers to an airtight container. Store it in the refrigerator where it will stay fresh for up to 4 days, making for easy dessert enjoyment anytime.
Freezing
If you want to keep this dessert longer, you can freeze it. Wrap the cooled cake securely with plastic wrap and foil or place it in a freezer-safe container. It will keep well for up to 3 months. Thaw overnight in the refrigerator before reheating.
Reheating
To enjoy leftovers warm, simply reheat individual portions in the microwave for about 30 seconds or warm the whole dish in the oven at 325 degrees Fahrenheit until heated through. This refreshes that wonderful gooey, buttery texture just like the first bake.
FAQs
Can I use fresh fruit instead of canned in the Cherry Pineapple Dump Cake Recipe?
While fresh fruit can be used, canned pineapple and cherry pie filling have that perfect consistency and sweetness for this dump cake. Fresh fruit may release too much juice or need additional sugar to match the flavor balance.
Is this recipe gluten-free?
The classic version uses traditional yellow cake mix which contains gluten. To make it gluten-free, you can try substituting a gluten-free cake mix, but results may vary slightly in texture.
Can I use different cake mixes in this recipe?
Absolutely! While the yellow cake mix is traditional, a white or even spice cake mix can add a delightful twist. Each will bring its own flavor profile to this adaptable dessert.
How sweet is the Cherry Pineapple Dump Cake Recipe?
This dump cake strikes a nice balance of sweetness from the canned fruits and the cake mix, with a bit of tartness from the cherries. If you prefer it less sweet, using a sugar-free cherry pie filling can help.
What’s the best way to serve this for a crowd?
Since this recipe yields about 8 servings in a standard 9×13 dish, you can easily double it for larger groups using a bigger pan or multiple dishes. Serving with small bowls and spoons lets guests help themselves to this crowd-pleaser.
Final Thoughts
This Cherry Pineapple Dump Cake Recipe is my go-to for whenever I want a quick, fuss-free dessert that still feels like a celebration. The juicy fruit mixture combined with that buttery crisp topping is a classic combination that never fails to wow. I’m confident this recipe will become one of your favorites to make and share, too!
Print
Cherry Pineapple Dump Cake Recipe
- Prep Time: 10 minutes
- Cook Time: 45 minutes
- Total Time: 55 minutes
- Yield: 8 servings
- Category: Dessert
- Method: Baking
- Cuisine: American
Description
This Cherry Pineapple Dump Cake is a simple, crowd-pleasing dessert that combines sweet cherry pie filling and tangy crushed pineapple topped with a buttery yellow cake mix. It’s incredibly easy to prepare, requiring no mixing—just dump the ingredients in a baking dish and bake until golden and bubbly.
Ingredients
Fruit Filling
- 20 ounce can crushed pineapple (undrained)
- 21 ounce can cherry pie filling
Cake Topping
- 1 box yellow cake mix (dry, about 15.25 ounces)
- 1 1/2 sticks butter (sliced; about 12 tablespoons or 170 grams)
Instructions
- Preheat Oven: Preheat your oven to 350°F (175°C) to ensure it’s ready for baking the dump cake.
- Prepare Baking Dish: Spray the bottom of a 9×13 inch glass baking dish with non-stick cooking spray to prevent the cake from sticking.
- Add Pineapple: Pour the entire undrained 20-ounce can of crushed pineapple evenly into the bottom of the prepared baking dish.
- Add Cherry Pie Filling: Spoon the 21-ounce can of cherry pie filling evenly over the crushed pineapple layer.
- Sprinkle Cake Mix: Evenly sprinkle the dry yellow cake mix over the combined fruit fillings to create the cake topping.
- Add Butter Slices: Place the sliced butter evenly over the dry cake mix, allowing it to melt and soak into the topping as it bakes.
- Bake: Bake the dump cake in the preheated oven at 350°F for 40 to 45 minutes, or until the top is golden brown and the fruit filling bubbles around the edges.
Notes
- Use a glass or metal 9×13 inch baking dish for even cooking.
- No need to stir; the butter melting during baking mixes everything together.
- For extra crunch, you can add chopped nuts like pecans or walnuts on top before baking.
- Serve warm with vanilla ice cream or whipped cream for a delicious treat.
- Store leftovers covered in the refrigerator for up to 4 days.


