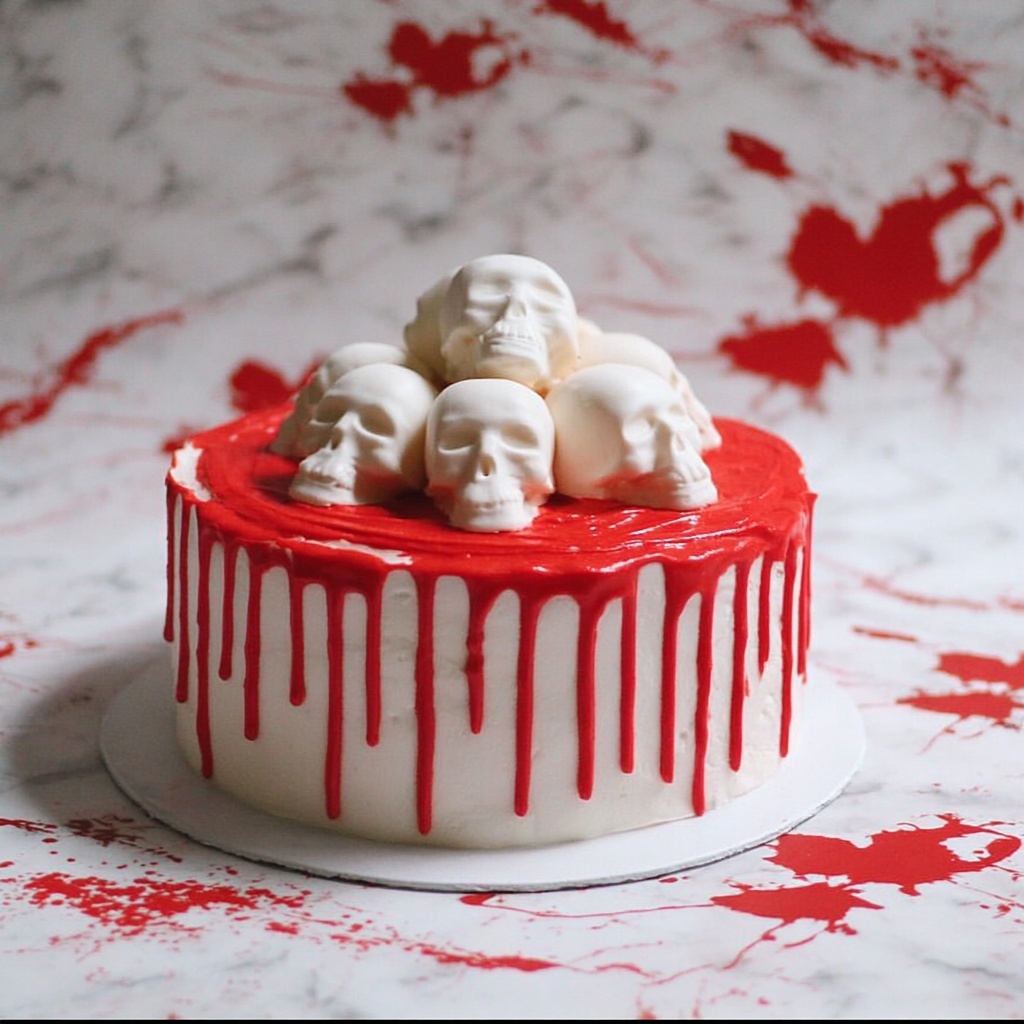
If you’re craving a showstopping dessert that’s as fun to make as it is to eat, this Skull Cake Recipe is going to steal the spotlight at your next gathering. Packed with rich red velvet layers, silky cream cheese frosting, and topped with hauntingly delightful edible skulls made from white candy melts, this cake blends spooky with scrumptious in a way that turns every bite into a celebration. Whether you’re baking for Halloween, a themed party, or just because you love a bit of dramatic flair in your desserts, this Skull Cake Recipe is your go-to for impressing friends and indulging your sweet tooth simultaneously.
Ingredients You’ll Need
The beauty of this Skull Cake Recipe is how straightforward the ingredients are, yet each one plays a crucial role in creating those contrasting textures and vibrant colors that make the cake so memorable. From the creamy butter-based frosting to the rich red velvet layers and crisp white candy skulls, every component adds a unique touch to the final masterpiece.
- Wilton white candy melts (3 bags, 8 oz each): Perfect for creating smooth, glossy skulls with a clean white finish that’s easy to mold.
- Chocolate skull molds: Essential to shape the candy melts into realistic and fun skull decorations.
- Red Velvet cake mix (3 boxes): Provides a moist, tender cake base with that signature rich red color and subtle cocoa flavor.
- Large eggs (6): Bind the ingredients and add moisture for a fluffy texture.
- Butter, unsalted and softened (1 ½ cup for batter, 2 cup for frosting): Adds richness and a velvety mouthfeel in both cake and frosting.
- Whole milk (3 cups): Keeps the batter smooth and tender, balancing the cake’s density.
- Powdered sugar (6 cups): Sweetens and thickens the frosting to the perfect consistency.
- Pure vanilla extract (1 Tbsp): Enhances flavors and brings warmth to the frosting.
- Heavy whipping cream (7 Tbsp): Creates a light, creamy texture for the frosting.
- Red cookie icing (3 tubes): Used for the dramatic drip effect and intricate finishing touches.
How to Make Skull Cake Recipe
Step 1: Prepare the Candy Skulls
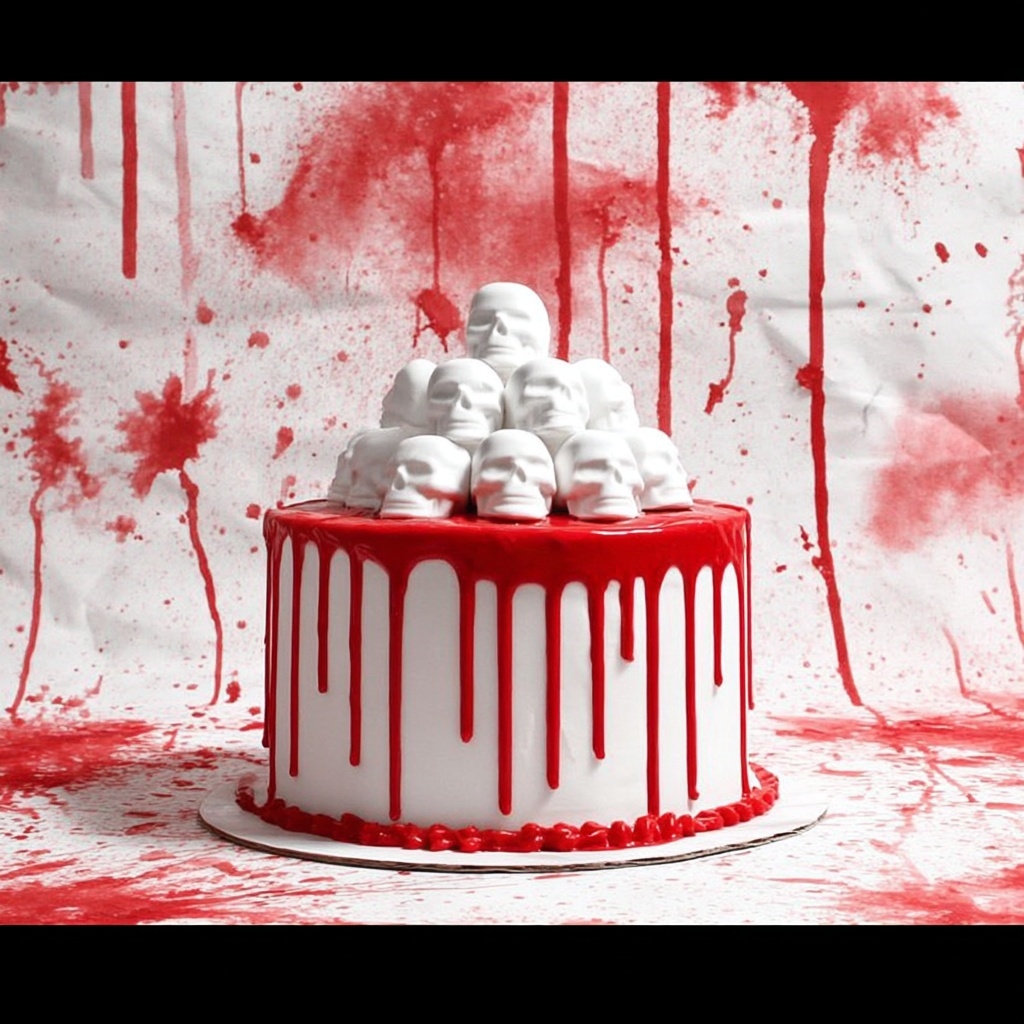
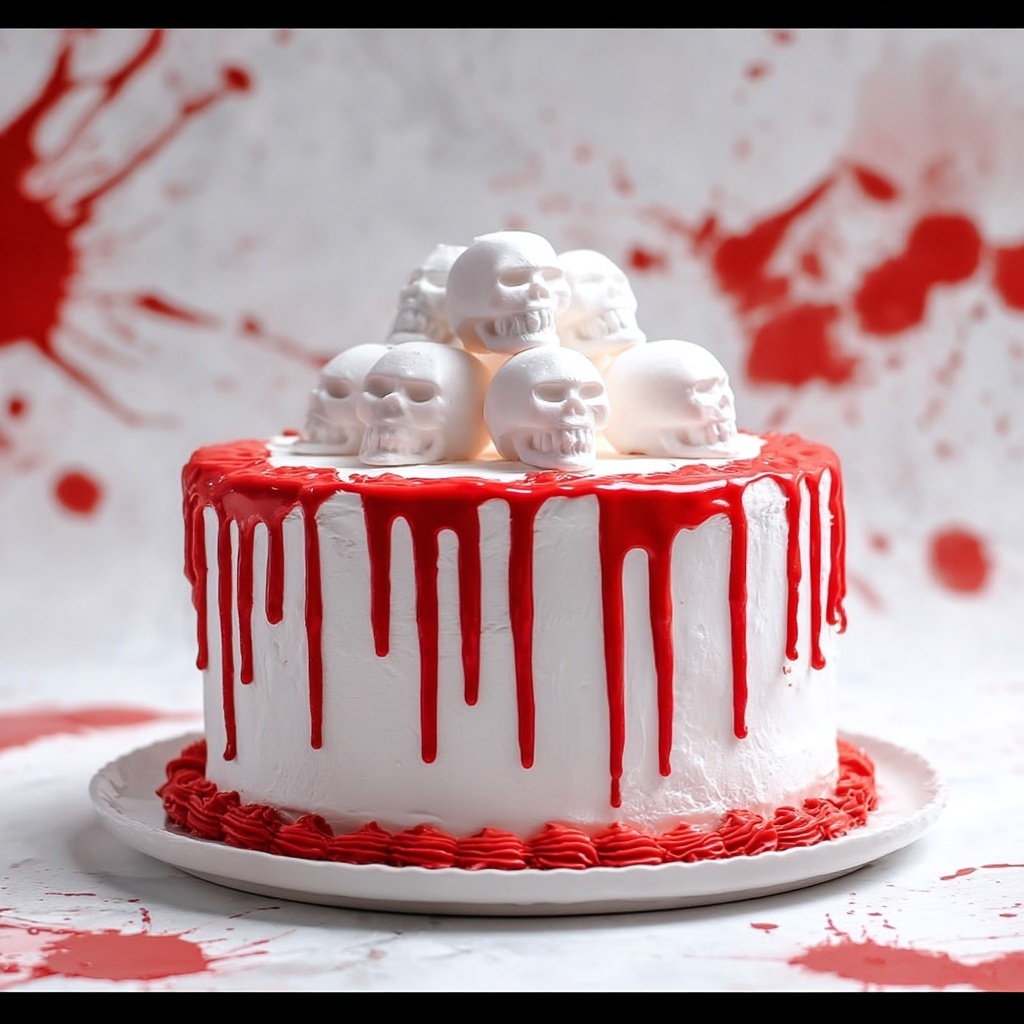
Start by melting the Wilton white candy melts as per the package instructions. This step is crucial for smooth, glossy candy that will set firmly into the skull molds. Once melted, carefully pour the candy into your chocolate skull molds. For this cake, you’ll want about 15 small skulls to decorate the mound and 5 to 6 larger skulls to create a focal point. Let them set completely before moving on—this ensures your skulls are crisp and beautiful, ready to crown your cake with spooky elegance.
Step 2: Bake the Red Velvet Cake Layers
Preheat your oven to 350°F (175°C) and generously spray your cake pans with baking spray to prevent sticking. In a large mixing bowl, combine the red velvet cake mix, eggs, softened butter, and whole milk. Use a stand mixer or a handheld beater to blend everything until smooth and uniform; this will give you those moist, tender layers that hold up well to frosting. Divide the batter evenly into the prepared pans and bake for about 25-28 minutes until a toothpick inserted comes out clean with just a few crumbs attached. Once done, let the cakes cool completely before assembling.
Step 3: Level and Assemble the Cake
Once your cakes have cooled, gently remove them from their pans and transfer them onto cake boards for easier handling. To create a stable and even base, use a cake leveler or serrated knife to trim off the domed tops, leaving flat, uniform layers. This step ensures your Skull Cake Recipe stacks beautifully and looks polished.
Step 4: Make the Creamy Frosting
Using your stand mixer with the paddle attachment, beat together the softened butter, powdered sugar, vanilla extract, and heavy whipping cream until the mixture is fully combined, creamy, and stiff enough to hold its shape. This frosting is the perfect balance of sweet and buttery, providing a luscious contrast to the cake’s tender crumb.
Step 5: Layer and Frost the Cake
Spread about one cup of the frosting evenly over the first cake layer. Place the second layer on top and repeat with another cup of frosting. Add the final cake layer and generously frost the entire exterior with the remaining frosting, smoothing it out as best as possible. Once fully frosted, pop the cake into the fridge for a few hours to let the frosting firm up—this sets the stage for the decorative fun to come.
Step 6: Add Final Decorative Touches
After chilling, gently squeeze the red cookie icing around the edges of the cake’s top to create a dramatic drip effect, evoking a perfect gothic vibe. Then, using the leftover frosting as a sticky “glue,” carefully build a mound of your white candy skulls right at the center of the cake. Stack and arrange the skulls creatively to make your cake look as spooky and spectacular as you imagined. Now your Skull Cake Recipe is ready to wow every guest!
How to Serve Skull Cake Recipe
Garnishes
To give your Skull Cake that extra wow factor, consider sprinkling a little edible glitter or edible red dust over the candy skulls to catch the light and add a subtle shimmer. Fresh mint leaves can also add a pop of green that contrasts beautifully against the red and white color palette without overpowering the spooky theme.
Side Dishes
Serve this cake alongside simple accompaniments like fresh berries or a scoop of vanilla ice cream. The freshness of the berries balances the richness of the cake and frosting, while ice cream adds a cold and creamy texture that pairs perfectly with each decadent bite.
Creative Ways to Present
For an unforgettable presentation, place the Skull Cake Recipe on a rustic wooden cake stand or a mirrored plate to amplify the chilling effect. Adding battery-operated LED candles around the base or even edible “fog” made from dry ice (handled carefully) creates an immersive eerie atmosphere that guests will talk about long after dessert is over.
Make Ahead and Storage
Storing Leftovers
Your Skull Cake will stay fresh for up to four days when stored in an airtight container in the refrigerator. Keeping it chilled helps maintain the firmness of the candy skulls and the stability of the frosting, so it looks just as good when you serve leftovers.
Freezing
If you want to prepare in advance, this cake freezes beautifully. Wrap the whole cake tightly in plastic wrap and then in aluminum foil to protect it from freezer burn. It can be frozen for up to two months. When you’re ready to serve, thaw it overnight in the refrigerator to preserve the texture and flavor.
Reheating
Since this is a cold dessert with frosting and candy decorations, reheating is not recommended. Instead, allow it to come to room temperature for about 30 minutes before serving to soften the frosting slightly and bring out the flavors.
FAQs
Can I use a different cake flavor for the Skull Cake Recipe?
Absolutely! While red velvet adds a dramatic visual and flavor contrast, you can experiment with chocolate, vanilla, or even pumpkin spice cake to suit your preferences. Just keep in mind that the red color really enhances the spooky aesthetic.
Where can I find candy skull molds?
You can find candy skull molds at specialty baking stores, craft stores, or online retailers like Amazon. Silicone molds tend to be great for easy release and reusability.
Is there an alternative to red cookie icing for the drip effect?
If you prefer, you can melt red candy melts or colored white chocolate to create the drip. This option cures harder than icing, offering a different texture and finish.
How do I avoid the candy melts cracking when unmolding skulls?
Make sure to temper your candy melts correctly by following the package directions closely. Also, allow the candy to fully harden at room temperature before trying to remove them gently from the molds.
Can I make the frosting less sweet?
Yes, you can reduce the powdered sugar slightly or add a pinch of salt to balance the sweetness. Taste as you go to find the perfect balance that suits your palate.
Final Thoughts
Baking this Skull Cake Recipe is such a rewarding experience, mixing cozy comfort with playful creativity. It’s not just about making a cake; it’s about crafting a centerpiece that brings smiles, wonder, and a touch of spooky fun to any table. Whether you’re a seasoned baker or a curious first-timer, dive in and watch this cake become a fast favorite in your recipe collection. You’ll be amazed at how deliciously dramatic dessert time can be!
Print
Skull Cake Recipe
- Prep Time: 35 minutes
- Cook Time: 25 minutes
- Total Time: 60 minutes
- Yield: 12 servings
- Category: Dessert
- Method: Baking
- Cuisine: American
Description
This spooky Skull Cake recipe combines moist red velvet cake layers with creamy frosting and stunning white candy melt skulls for a chillingly delightful dessert perfect for Halloween or any themed celebration. Decorated with a dramatic red drip and a mound of intricately made candy skulls, this cake is sure to impress both in flavor and presentation.
Ingredients
Candy Skull Decoration
- 3 (8 oz) bags Wilton white candy melts
- Chocolate skull molds
- 3 tubes red cookie icing
Red Velvet Cake
- 3 red velvet cake mix boxes
- 6 large eggs
- 1 ½ cups unsalted butter, softened
- 3 cups whole milk
Frosting
- 2 cups unsalted butter, softened
- 6 cups powdered sugar
- 1 tablespoon pure vanilla extract
- 7 tablespoons heavy whipping cream
Instructions
- Melt Candy Melts: Follow the instructions on the candy melt packages to carefully melt the Wilton white candy melts, ensuring a smooth consistency for molding.
- Create Skull Shapes: Use the chocolate skull molds as directed to form approximately 15 small skulls and 5-6 large skulls. Set these skulls aside to harden completely.
- Preheat Oven: Preheat your oven to 350°F (175°C) and coat your cake pans evenly with non-stick baking spray.
- Prepare Cake Batter: In a stand mixer or using a hand beater, combine the red velvet cake mix, eggs, softened butter, and whole milk. Beat until the batter is smooth and well mixed.
- Bake Cakes: Evenly pour the batter into the prepared cake pans. Bake for 25-28 minutes, or until a toothpick inserted into the center comes out mostly clean with a few crumbs.
- Cool Cakes: Allow the cakes to cool completely in the pans before carefully removing them onto cake boards for assembly.
- Level Cakes: Using a cake leveler or serrated knife, trim the tops of the cakes to make all layers flat and even in height.
- Make Frosting: In a stand mixer fitted with a paddle attachment, beat together the softened butter, powdered sugar, vanilla extract, and heavy whipping cream until the frosting is creamy, thick, and stiff.
- Assemble Layers: Place one cake layer on your cake board, spread 1 cup of frosting evenly on top, then add the second layer. Repeat with another 1 cup frosting. Place the last cake layer on top.
- Frost Cake: Use the remaining frosting to cover the entire cake smoothly and evenly.
- Chill Cake: Refrigerate the frosted cake for several hours to allow the frosting to harden and set firmly.
- Add Red Drip: Once chilled, use the red cookie icing to create a dripping effect around the top edge of the cake by gently squeezing the icing out in small drops.
- Decorate with Skulls: Arrange the hardened candy skulls in a mound at the center of the cake, using any leftover frosting as adhesive to secure the skulls stacked on one another.
- Serve and Enjoy: Your spooky Skull Cake is now ready to be served and enjoyed at your next Halloween party or themed event!
Notes
- Make sure candy melts are fully hardened before stacking skulls to prevent breaking.
- Leveling the cake layers ensures a smooth, stable final appearance.
- Keep the cake refrigerated if not serving immediately to maintain frosting firmness.
- Use gloves when handling the candy skulls to avoid fingerprints.
- For extra flavor, consider adding a teaspoon of cocoa powder to the frosting for a subtle chocolate touch.


