
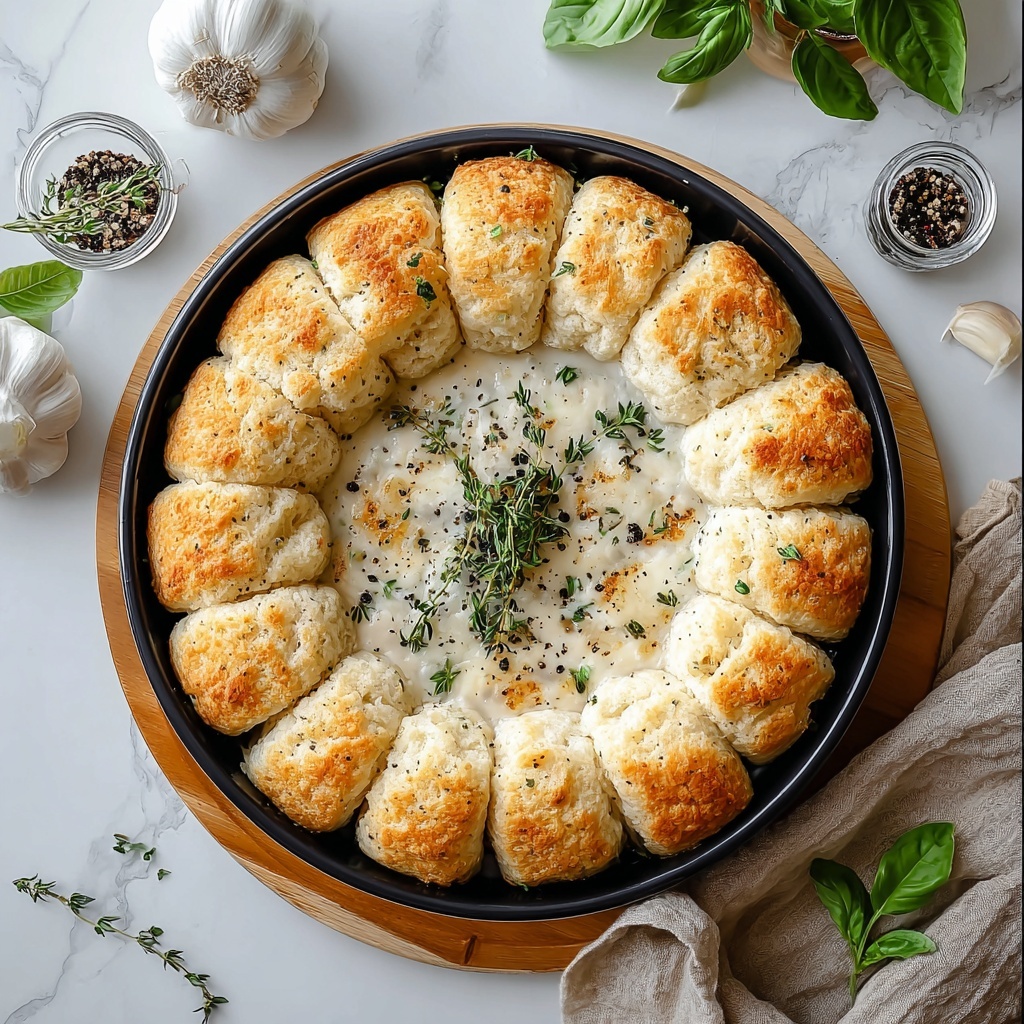
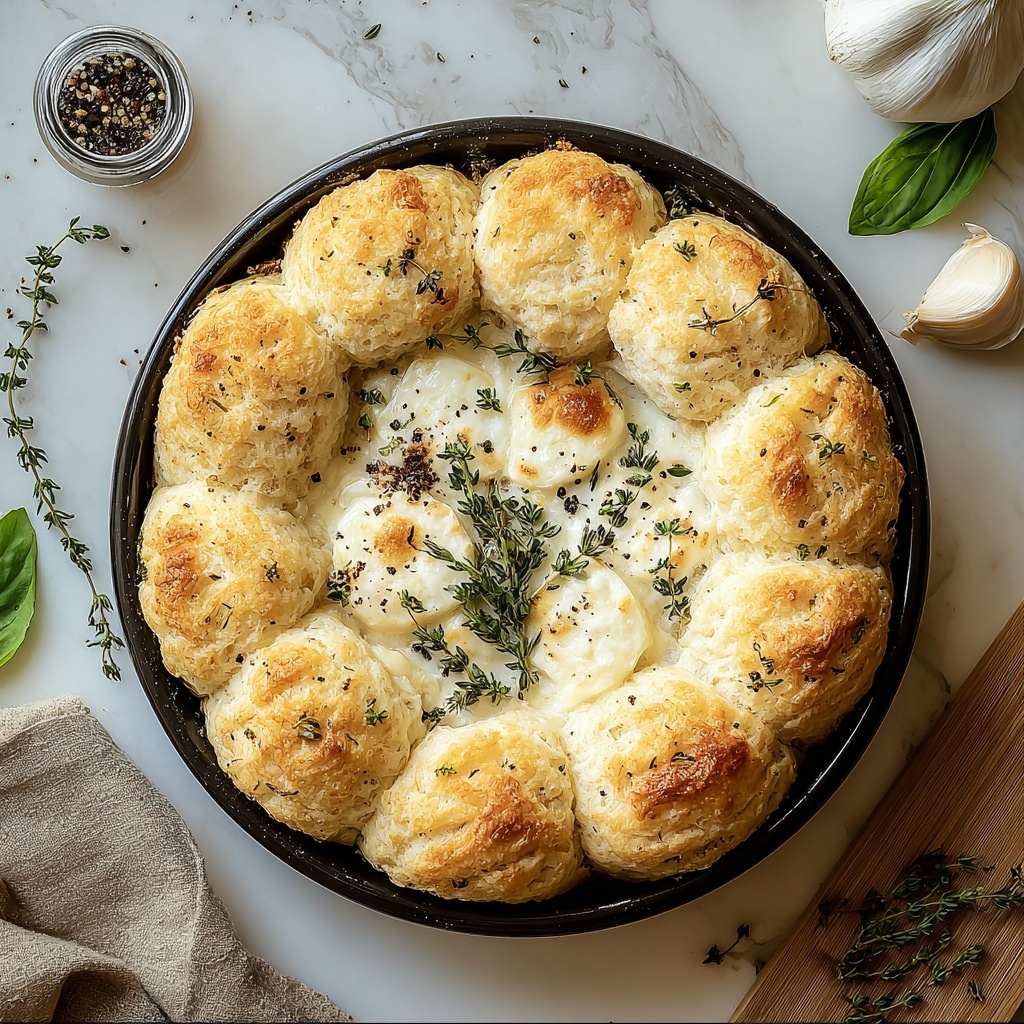
If you’re craving an irresistibly cheesy, buttery snack that’s quick to whip up and guaranteed to impress, look no further than this Mouthwatering Pillsbury Biscuit Garlic Butter Cheese Bombs Recipe. These little bites pack an explosion of gooey mozzarella and sharp Parmesan tucked inside a golden, garlicky biscuit that’s crisp on the outside and soft on the inside. Whether you’re feeding a crowd or just spoiling yourself with a decadent treat, this recipe makes the perfect savory delight.
Ingredients You’ll Need
Don’t let the simplicity of these ingredients fool you because each one is crucial to building layers of flavor and that perfect, melt-in-your-mouth texture. The combination of gooey cheeses, fragrant garlic butter, and fresh parsley turns store-bought biscuits into a sensational homemade treat.
- Pillsbury refrigerated biscuits: The convenient base that’s soft, flaky, and easy to work with for stuffing and folding.
- Butter, melted: Infuses richness and helps coat the cheese bombs for a golden finish.
- Garlic, minced: Brings that irresistible punch of savory aroma and flavor that takes this dish to the next level.
- Mozzarella cheese, shredded: Melts beautifully and creates that stretchy, luscious center.
- Parmesan cheese, grated: Adds a zesty, nutty contrast that complements the mozzarella perfectly.
- Fresh parsley, chopped: A burst of color and a fresh herbal note to brighten each bite.
How to Make Mouthwatering Pillsbury Biscuit Garlic Butter Cheese Bombs Recipe
Step 1: Prepare Your Oven and Baking Sheet
Start by preheating your oven to 350°F (175°C) so it’s ready to go when you are. Line a baking sheet with parchment paper, which makes cleanup a breeze and prevents sticking during baking.
Step 2: Separate the Biscuits
Open the can of Pillsbury refrigerated biscuits and gently pull them apart. These tender rounds are the perfect canvas for stuffing with cheesy goodness.
Step 3: Make the Garlic Butter Mixture
In a small bowl, combine your melted butter with the minced garlic. This mixture will coat the cheese bombs, giving them that rich garlicky flavor and a beautiful golden color as they bake.
Step 4: Stuff the Biscuits with Cheese
Take one biscuit at a time and flatten it slightly with your fingers. Place about one teaspoon of shredded mozzarella and a pinch of Parmesan in the center. This filling is where the melty magic happens.
Step 5: Seal Into Cheese Bombs
Carefully fold the edges of the biscuit around the cheese to seal it completely, pinching the dough together and shaping it into a tight ball. This ensures all that cheesy goodness stays locked inside while baking.
Step 6: Coat with Garlic Butter
Dip each cheese-filled biscuit ball into the garlic butter mixture. Make sure each one is evenly coated – this step is key for that irresistible golden crunch and garlic aroma.
Step 7: Arrange on Baking Sheet
Place the coated biscuit balls on your prepared baking sheet, spacing them slightly apart. This gives each cheese bomb room to puff up as they bake.
Step 8: Bake Until Golden and Melty
Bake in your preheated oven for 12 to 15 minutes. You’ll know they’re ready when the cheese bombs become beautifully golden and the cheese inside has melted into a luscious center.
Step 9: Brush with Remaining Garlic Butter
As soon as the cheese bombs come out of the oven, brush them with any leftover garlic butter. This extra touch adds gloss, richness, and another layer of flavor.
Step 10: Sprinkle with Fresh Parsley
Scatter freshly chopped parsley on top to add a pop of green color and a hint of fresh brightness that balances the richness perfectly.
Step 11: Serve and Enjoy
Serve these Mouthwatering Pillsbury Biscuit Garlic Butter Cheese Bombs Recipe creations warm for maximum gooey, cheesy bliss. Trust me, they disappear fast!
How to Serve Mouthwatering Pillsbury Biscuit Garlic Butter Cheese Bombs Recipe
Garnishes
A sprinkle of extra Parmesan cheese or a dash of red pepper flakes can elevate the presentation and amp up the flavor profile. For a touch of freshness, a few basil leaves or a drizzle of marinara sauce are fantastic options that invite dipping and sharing.
Side Dishes
Pair these cheese bombs with a crisp green salad or a bowl of tomato soup for a classic match made in heaven. They also work wonderfully alongside pasta dishes or a hearty chili, making your meal feel indulgent and complete.
Creative Ways to Present
Serve the cheese bombs in a rustic bread basket lined with parchment paper or arrange them on a wooden board with small bowls of dipping sauces like ranch, garlic aioli, or spicy marinara. This makes for a perfect appetizer platter that will have everyone reaching for more.
Make Ahead and Storage
Storing Leftovers
Store any leftover cheese bombs in an airtight container in the refrigerator for up to 3 days. Keep in mind that the texture will be best when reheated properly to refresh the crispness of the outside.
Freezing
You can freeze these delicious bites before baking by placing them on a tray, freezing until firm, then transferring them to a freezer bag. When ready to enjoy, bake from frozen, adding a few extra minutes to the cooking time to ensure they’re cooked through.
Reheating
Reheat leftovers in the oven at 350°F (175°C) for about 8-10 minutes to get the outside crispy again and the cheese warmed through. Avoid microwaving if you want to preserve that signature texture and avoid sogginess.
FAQs
Can I use other cheeses instead of mozzarella and Parmesan?
Absolutely! Feel free to experiment with cheddar, gouda, or even pepper jack for a different flavor twist. Just make sure your replacements melt well for that gooey center.
Is this recipe gluten-free?
Unfortunately, no. Pillsbury refrigerated biscuits contain wheat flour, so this recipe is not suitable for those avoiding gluten unless you find a gluten-free biscuit alternative.
How spicy are these cheese bombs?
This recipe is mild and savory, perfect for all ages. If you want some heat, consider adding a pinch of crushed red pepper flakes to the garlic butter mixture or serving with a spicy dipping sauce.
Can I make these cheese bombs vegan?
To make a vegan version, substitute plant-based biscuits, vegan butter, and dairy-free cheeses. Keep in mind that the texture and flavor will vary, but the concept remains delicious!
Is this recipe kid-friendly?
Definitely! Kids love the cheesy surprise in every bite, and the garlic butter flavor adds just enough richness without being overpowering. They make a fantastic snack or party appetizer for little ones.
Final Thoughts
If you’re looking for a fun, quick, and absolutely delish snack or appetizer, you have to try this Mouthwatering Pillsbury Biscuit Garlic Butter Cheese Bombs Recipe. It’s a guaranteed crowd-pleaser that brings comfort and joy with every bite. So grab a can of biscuits and get baking — your taste buds will thank you!
Print
Mouthwatering Pillsbury Biscuit Garlic Butter Cheese Bombs Recipe
- Prep Time: 15 minutes
- Cook Time: 15 minutes
- Total Time: 30 minutes
- Yield: 8 cheese bombs (based on typical Pillsbury biscuit can size)
- Category: Appetizer
- Method: Baking
- Cuisine: American
Description
Delight in these mouthwatering Pillsbury Biscuit Garlic Butter Cheese Bombs, packed with gooey mozzarella, savory Parmesan, and rich garlic butter. Perfectly baked to golden perfection, these cheesy bites are an irresistible appetizer or snack that’s quick and easy to prepare.
Ingredients
Cheese Bombs
- 1 can Pillsbury refrigerated biscuits
- 1 cup shredded mozzarella cheese
- 1/4 cup grated Parmesan cheese
Garlic Butter
- 1/2 cup butter, melted
- 2 cloves garlic, minced
- 1 tablespoon fresh parsley, chopped
Instructions
- Preheat Oven: Preheat your oven to 350°F (175°C) and line a baking sheet with parchment paper to prevent sticking and ease cleanup.
- Prepare Biscuits: Open the can of Pillsbury refrigerated biscuits and separate each biscuit carefully.
- Make Garlic Butter: In a small bowl, combine the melted butter with the minced garlic to create a flavorful garlic butter mixture.
- Fill Biscuits: Take one biscuit, flatten it slightly with your hands, then place about 1 teaspoon of shredded mozzarella and a pinch of Parmesan cheese in the center.
- Seal Cheese Inside: Fold the edges of the biscuit over the cheese filling, sealing it completely, and shape it into a smooth ball.
- Coat with Garlic Butter: Dip the cheese-filled biscuit ball into the garlic butter mixture, ensuring it’s fully coated for maximum flavor.
- Arrange for Baking: Place the coated cheese bombs evenly on the prepared baking sheet and repeat with the remaining biscuits.
- Bake: Bake in the preheated oven for 12-15 minutes, or until the cheese bombs turn golden brown and are cooked through.
- Brush with Remaining Butter: After baking, brush any leftover garlic butter over the hot cheese bombs to enhance their buttery garlic taste.
- Garnish: Sprinkle fresh chopped parsley over the cheese bombs to add a touch of freshness and color.
- Serve: Serve warm immediately to enjoy the melty, cheesy goodness inside each bite.
Notes
- Use fresh garlic for the best flavor in the garlic butter mixture.
- Make sure to fully seal the biscuit edges to prevent cheese from leaking while baking.
- You can substitute mozzarella with a different melty cheese like cheddar or Monterey Jack if preferred.
- For added spice, consider mixing a pinch of red pepper flakes into the garlic butter.
- Serve with marinara sauce or ranch dip for extra flavor pairing.


